
Hers.
I think every room needs a little glam factor. Our guest bedroom started out pretty glamorous… for a nursery.

Now before you all freak out, no, my eggo’s not preggo. The above picture was taken when the sellers were still in the house. I’m still a little bummed they took the chandelier with them- that was the best part. They left us with a lovely 80s dome light in its place and the birdcage decals. Gee, you shouldn’t have… no, really, you shouldn’t have.
We haven’t shown many pictures of the guest room thus far (besides the construction of the bench at the end of the bed- read more here), so I guess we need to do a little catching up.
The guest room actually ended up being one of the first rooms we painted upon moving in since we had all the bedrooms re-carpeted immediately. And because we’re lazy painters, we wanted to paint while the old floors were still in so we didn’t have to cover them for protection against paint drips. The bright red color was cute for a nursery- a nice departure from the typical pink used for girls- but it was a little too… well, bright red, especially for a guest room. So, we went from bright red to a flat sheen of dark gray and softened it with whites and teal as the accent.

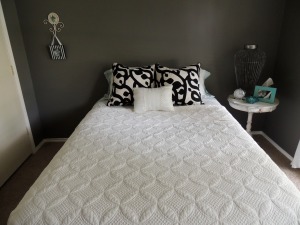

The dark gray brought some drama to this mama but I knew something was still missing. The wall above the bed was an empty void begging to be filled with awesome-ness.
Bedroom… drama… hmm… I smell a headboard project coming on.
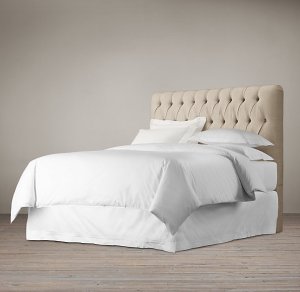
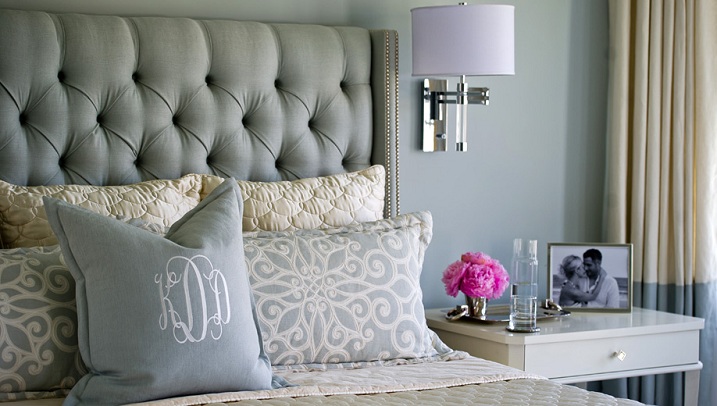
I knew I needed something pretty tall to cover up a lot of the blank space above the bed and I wanted the headboard to be the room’s statement piece. I was drawn to tall tufted options that included wings on the side that enveloped the bed such as these.

Source: Mix and Chic

Source: Jillian Harris
I was curious what headboards like this cost. I finally found a pretty close match to what I was dreaming of, seen below.

Source: Ethos Interiors
Unfortunately, it came with two problems:
- It was from Australia. I can only imagine what shipping a headboard from across the globe would cost.
- It was retailing for $690. Now, I’ve seen plenty of way more expensive headboards but still, $690 was more than I’ve spent on everything in our master bedroom thus far and this room would only get used a few times a year when we had overnight visitors so it didn’t really seem worth it.
I found a few, less exciting, domestic options from the usual suspects but those weren’t any more reasonable.

Source: Pottery Barn, $799

Source: Horchow, $1199
Source: Restoration Hardware, $1465
So, what’s a girl to do? Buy her husband some beer, suggest steak and potatoes for dinner (it helps if your husband is severely Irish), then sweetly ask his help DIY-ing a headboard masterpiece. This method has proven 100% effective thus far so, ladies, take notes.
And we were off.
First, I needed to settle on a fabric. Because I wasn’t 100% convinced this was going to work (not that I don’t have faith in you, honey, but this seemed a long shot even for you), I didn’t want to spend a ton on fabric. I also couldn’t decide on a color (should I go white, cream, light gray, medium gray, or dark gray) so I decided to let fate decide for me. At my favorite fabric store, I hit up the remnant section to see what white and gray options they had. I found one cream option (seen on the right) and one gray (seen on the left) option that were long enough to work.

At $5 a yard (each was 2.5 yards, which they rounded down to 2 costing me $10 each), it was a score. I thought I’d end up going with the cream option but it ended up looking too yellow against all the white bedding I already had in the room. I considered completely redoing all the bedding to better coordinate but my conveniently-too-pragmatic husband quickly shot that option down. So, gray it was.
His.
I’m beginning to think my wife has me figured out: every time she wants something expensive for the house, I end up building something almost identical for a fraction of the cost like the leaning bookshelves seen here and the telescope lamp seen here. Lately I’ve been suspecting that she doesn’t actually want the expensive version, she just wants to scare me into a DIY project by threatening to spend an obscene amount of money on something.
So her latest obsession? A headboard. For the guest bedroom. Now, here’s the thing about our guest bedroom: it’s just for guests. We don’t have overnight guests often and the few that we do have aren’t particularly picky about their lodging (if they were, we wouldn’t invite them to our house). So, frankly, I didn’t see the point. Sure, the space above the bed was empty, but the only time we ever really go in that room is when we can’t find the cat. Either way, Julie tends to get what Julie wants, so I now had to figure out how to make a headboard.
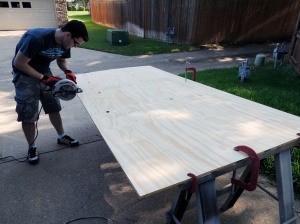
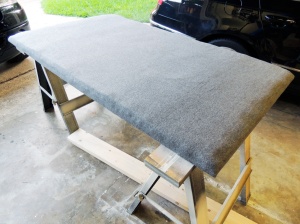
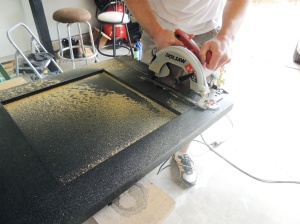
First things first: size. The width pretty much took care of itself as it would be dictated by the width of the bed frame, but we had to decide how tall we wanted it to be on the wall. We ultimately decided that it needed to be 5′, which meant the actual “board” part of the headboard would be 3′ tall. So I started with some plywood:

Cut cut cut!
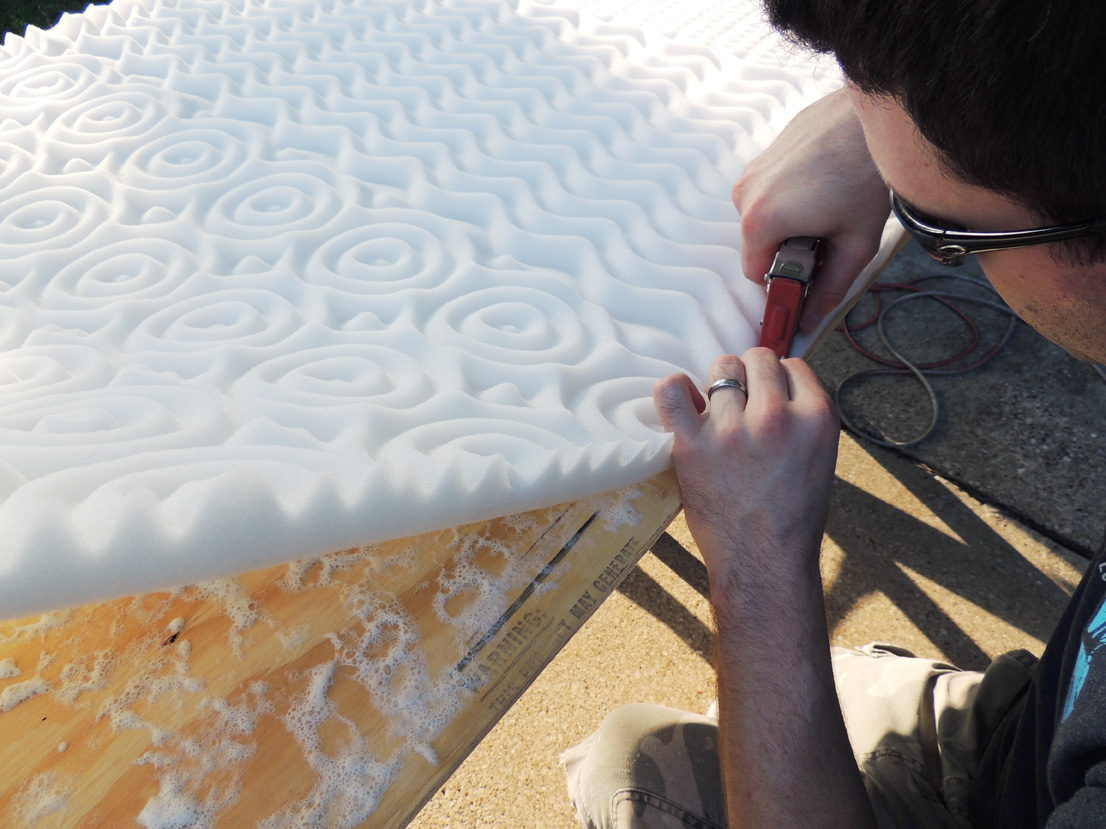
Next, Julie wanted some “poof” or something, so we looked at craft stores for foam padding. Well, it turns out that I could’ve taken a decent vacation for what it would’ve cost to buy that much padding, but I had a more cost-effective solution in mind:

That’s right, Wal-Mart mattress pads (yes, the same ones that when stacked high enough make dorm beds somewhat tolerable). It was plenty long but barely wide enough, but with a little stretching and clever layering, we hid it pretty well. We even had enough left over from the ends to refinish a small chair.

We used spray adhesive to secure them to the plywood, but due to the porous nature of the pads, it wasn’t the strongest hold.


We added a second because a) we needed the extra thickness and b) cheap mattress pads have weird textures pressed into them to make you think it has some bogus cooling effect or something. Not bad for just $20 for the pair.

I ended up stapling the edges for a cleaner finish and more permanent hold while we positioned the fabric.

And trimmed the excess:

Now, you normally use batting to ensure a smooth finish but we were on a mission of frugality and the cost of batting just wasn’t going to cut it. We realized that batting was essentially just a thick layer of fibers so we found a cheap-o cotton blanket to help hide any uneven points on the padding. Once again, our trip to Wal-Mart proved fruitful.
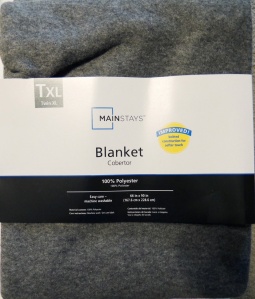
This time I flipped it over and stapled it to the back of the plywood so it held nice and tight across the padding:

Ignore the lumpy edges, those hide easily with the final piece of fabric.
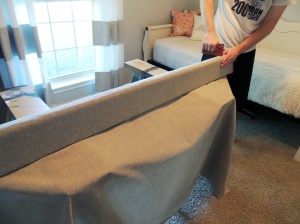
The next stage of the process was unexpectedly tedious. We moved things inside for a cleaner, cooler, and lighter work environment. Good thing we have an awkwardly empty space in our living room after all, I guess.

So we draped the fabric over the board and smoothed everything out. What came next was an exercise in patience and dedication: tufting. I don’t know how it’s normally done, but I knew how I was going to do it: screws. But using short screws and washers, I could create that “pressed in” look, and it would hold, like forever.

So I started in the center:

Note: the fabric was draped loosely over the ends of the board so we’d have plenty of slack if we needed it.

Initially I tried measuring where each screw would go but that got old quickly. Plus, the positioning of the fabric would change slightly as I pressed on it to screw it in, so eventually I figured out how to predict where things needed to be and just eyeballed it.


What seemed like years later, I had driven in all 67 screws. Now the weird part: trying to bunch up the fabric into a “diamond-shaped tuft”.


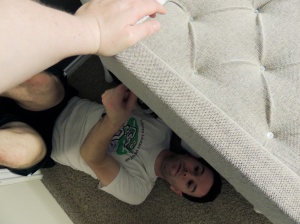
Finally, it was time to secure everything. I didn’t want to flip the board over and crush the tufting, so I had to work from below. Fortunately we have an extra bedroom that is also awkwardly empty, so there was some soft floor space so I could work on my back.

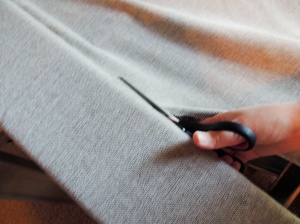
After stapling all around, we cut off the excess fabric.

We folded a straight line from the end of each tuft off the edge to create a uniform look around all the edges. We then stapled that tuft to the back of the headboard so it held.

After completing the board, it was time to move on to the posts. I used generic 2×6 lumber but had to be careful to select really straight pieces. Each post was 5′, so I just bought one 2x6x10 and cut it in half.

The process for wrapping the posts in fabric was a bit like wrapping a present, but instead of a box it’s lumber, instead of paper it’s fabric, and instead of tape it’s staples. we also made sure all the staples and edges ended up in what would be the back side of the board, so the nice smooth edge faced outward.
First with the cheap blanket:


Be sure to wrap the ends, too:

Repeat process with actual fabric:


Cut off excess:

Finally, it was time to put it all together. We moved the board to the guest room and laid it on the bed. Then, I set the posts up on the side and had Julie press down while I drilled up. This was actually a really difficult process, and of course Julie decided pictures were more important than being helpful.
Almost done (I only had to chase the cat away 100 times).

Repeat the process for the other side, and your headboard is done. Time to mount it! Fortunately our bed frame had a bracket welded onto it for who knows what, but it had some holes I was able to run some drywall screws through to secure everything so it didn’t flip over and turn my in-laws into Flat Stanley.

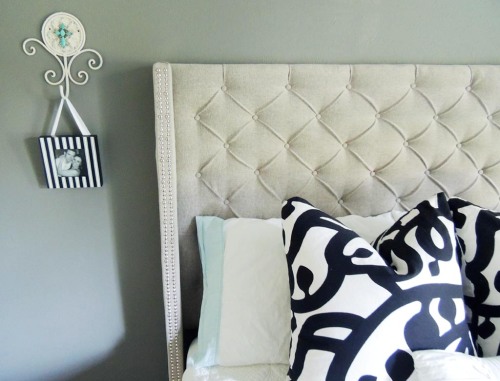
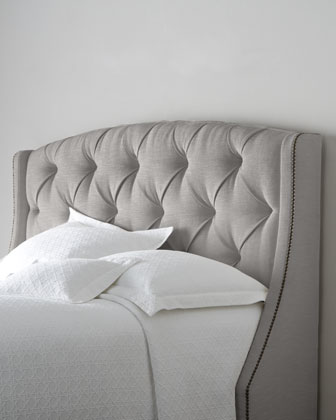
Huzzah! Headboard!

Hers.
We wrapped up the upholstery work and installed the headboard in the room. I then realized I had a dilemma. Do I stop here or do I keep going? Much like Sandro on this season’s Project Runway (anyone else watching this season?), I decided our headboard needed more bling and by bling, I, of course, mean nailhead detail. After two calls consulting outsiders, one voted for, one voted against, I ultimately decided to go for it. Oh yes, these side wings were in for a treat.
So while Chris stood beside me, giving himself a pat on the back for finishing another project, I, instead, smiled sweetly at him and asked for his help on the next stage of the project.
And I soon learned a vital lesson- never EVER convince yourself to save a few dollars by buying a case of loose nailhead, thinking you can spend a few extra minutes taking care to line them up straight. This is the most frustrating, arduous process that I wouldn’t wish on my worst enemy. Chris thought it would help by buying fishing line and nailing it down as a guide to follow.


A great idea in theory but it didn’t execute that well. Each time we’d nail a head in, it seemed impossible to get it to line up with the fishing line. At the last second, it would go rogue on us and veer off course. After an hour spent on this and barely making progress, I decided we could splurge and buy the cheater’s kit aka a nailhead kit that you only had to nail every 10th or so piece aka my lifesaver.
People of the DIY world- spend the extra dough for this. So. Worth. It.
I bought mine at Michael’s, but here’s a link to buy it from Amazon.
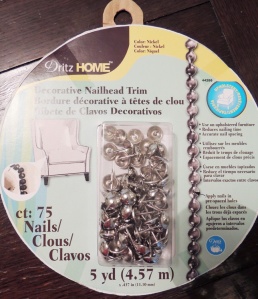
If that doesn’t convince you, it comes with a bonus of packaging that doubles as a cat toy.

After the nightmare of sparring with individual nailheads, this was a breeze. You just unwrap the string of nailhead from the packaging and cut it off where you need it to stop. I suggest cutting it to size before you begin nailing it in because the weight from the package makes it harder to install straight.

Next, place the string on the headboard and nail in the heads where there’s a hole in the trim (every 10th head or so). Tip: use a rubber mallet to nail in the head to prevent scratches.

30 minutes and 2 nailhead trim kits later, I was done!
Stay tuned for an additional post on how we made the fabric-covered buttons to complete the tufted look.
Materials and Costs:
- Fabric (from local fabric store): $10 for the full remnant
- Foam (aka 2 egg crate mattress pads from Walmart): $20
- Batting (aka cheap blanket from Walmart): $5
- Spray Adhesive (any craft store): $0 as we already had some on-hand
- Staples and Staple Gun (any home improvement store): $0 as we already had some on-hand
- Small sheet metal screws (from Home Depot): $3
- Plywood (from Home Depot): $10
- 2x6s to create side wings (from Home Depot): $5
- Washers (from Home Depot): $1
- 2 nailhead trim kits (from Michael’s with 40% off coupon): $24
- Rubber mallet (from Walmart): $5
- Button making kit (from this eBay vendor): $17
Total: $100
After.


Update: To see how we made fabric buttons to cover the screws on the headboard, check out our easy, step-by-step guide here.


