Exciting News!

Hers.

Knock Off Decor Feature

We’re so excited to announce that our barn door tutorial was featured on Knock Off Decor today!  Check out the full post on their site here.  To our readers who haven’t been to Knock Off Decor before, I’ll warn you now, you’re about to be sucked in to pages and pages of the most amazing DIY tutorials that show how to recreate pieces that look just like the high end versions from places like Restoration Hardware and Pottery Barn!  I’m seriously addicted to this site and have found tons of great ideas there.  And, spoiler alert!  They’ll be featuring our barn door hardware later this week.

To all our new readers who heard about us from Knock Off Decor, welcome!  We’re glad to have you stop by, hopefully gain some inspiration, and, above all, have a laugh at how ridiculous renovation life can truly be.

To jump to our original posts on both of those elements, see below for links.

-Julie

2 Comments

Filed under Site Housekeeping

Let Us Show You the Door (Hardware)

DO or DIY | Barn Door Hardware DIY

Hers.

Question: what’s more suspenseful than a Game of Thrones finale?

Answer: Our barn door project.

I know we’ve left you in the dark for a bit (ok, maybe an eternity) but we’re finally back to log details for how to create the most cost efficient barn door hardware.  I promise it was worth the wait.

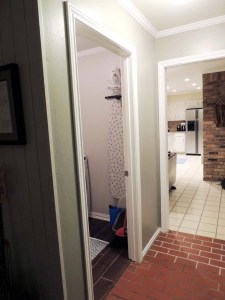
So, where were we?  Oh, right.  Our laundry room looked like this.

dscn0750-23-03-01

And then we installed a new washer and dryer.  The new washer stuck out further than the old one thus blocking the door from being open all the way.  Julie goes out of town.  Chris goes on a door rampage and rips it out so we’re left doorless.

DO or DIY | How to Build a Barn Door

Julie returns home to find said doorless laundry room.  Julie freaks out (just a little) and goes on her own rampage to find a solution.

Enter, the barn door.  *Cue the angelic music.  The barn door search is on.  We soon discover the high prices authentic barn doors are fetching.  The search is off.

But then, an idea struck.  We could BUILD a door and by “we” I mean my very talented husband… with some lots of coaxing (and beer).

Voilah, instant barn door (sort of).  Read our DIY guide for the door here.

DO or DIY | How to Build a Barn Door

Now that you’re caught up, let’s finally let you in on the secret of our super affordable barn door hardware.

Not sure why we were surprised after the shocking realization of the outrageous prices of barn doors, but we soon found ourselves in the same dilemma with the hardware.  The going rate for barn door hardware is the equivalent of several pairs of nice, new shoes and I had to somehow justify the new pair of boots that snuck into my shopping cart.  We needed an alternative solution especially since I seem to be cursed with expensive taste.

Seriously, every hardware inspiration I pinned on Pinterest seemed to be the most expensive.  Lucky me.  I was gravitating towards the chunkier hardware with large pulleys that made a big statement.  Don’t these make you swoon?

DO or DIY | Barn Door Hardware DIY

Source: A Tree Lined Street

I found the two below similar options but the price wasn’t exactly on point.

DO or DIY | Barn Door Hardware DIY

Source: Real Sliding Hardware, $353

DO or DIY | Barn Door Hardware DIY

Source: Rustica Hardware, starting at $272

So, I turned to Chris and issued a new challenge- recreating the look of this hardware for a fraction of the price.  Which, I’m pretty sure his male brain instantly translated into “project = cutting metal = sparks flying everywhere = awesome” because I haven’t heard him agree to a project that quickly… ever.

His.

Now, where were we?

Ah. Yes. Hardware.

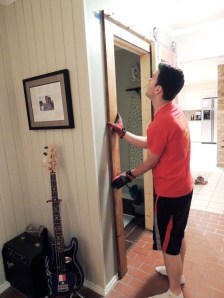
But first things first: I had to shrink an entrance.

The door we built wasn’t going to be wide enough to fully close, i.e. a gap would always show. Why did we do such a silly thing? Because a door any wider than the one we built wouldn’t have been able to open all the way before hitting the trim for the entrance to the kitchen. So we actually put up more wood around the doorway so we could use a smaller door which, ironically, meant that we had an effectively larger doorway. What?

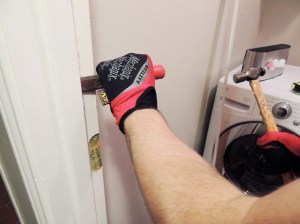
Anyway, I first had to removed the door stop pieces from the door frame. A lot of people don’t realize these are just wood pieces nailed onto the door frame, so eliminating a door is actually really easy, and all you need is a hammer and chisel. And sandpaper. And maybe putty. And paint.

DO or DIY | DIY Barn Door Hardware

Next, I pulled the trim off the outside:

DO or DIY | DIY Barn Door Hardware

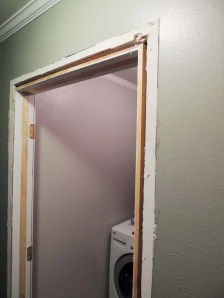
See? Now it’s just a flat frame.

DO or DIY | DIY Barn Door Hardware

But this still didn’t solve the problem entirely, as I had to reduce the width of the doorway. My solution was to use regular 2×6 lumber. The only problem was that the 2×6 was actually too wide, so I had to rip it down to be the same width as the thickness of the frame.

Recognize that table saw, Pop?

DO or DIY | DIY Barn Door Hardware

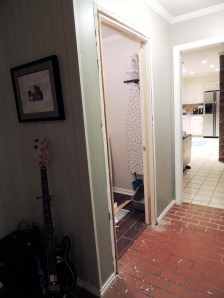
If you’re like Julie and just rely on the pictures to figure out what the heck I’m talking about, behold: a narrower doorway.

DO or DIY | DIY Barn Door Hardware

Oh and while I was nailing up one side of the trim, the other side I was about to install fell and broke a picture frame. Don’t tell Julie.

DO or DIY | DIY Barn Door Hardware

So now I could work on hanging the door. Which would require hardware.

After looking at various hardware configurations, I was beginning to get frustrated. There’s really nothing I could find that I could easily modify into barn door hardware, and I was beginning to think we’d have to suck it up and just buy something.

But then I realized something: there’s nothing complex about barn door hardware. There are no complicated linkages, special fittings, or tight tolerances. It’s just brackets and pulleys. And they’re not even fancy brackets. So I figured if I could find the right raw materials, there wasn’t any reason I couldn’t just make my own.

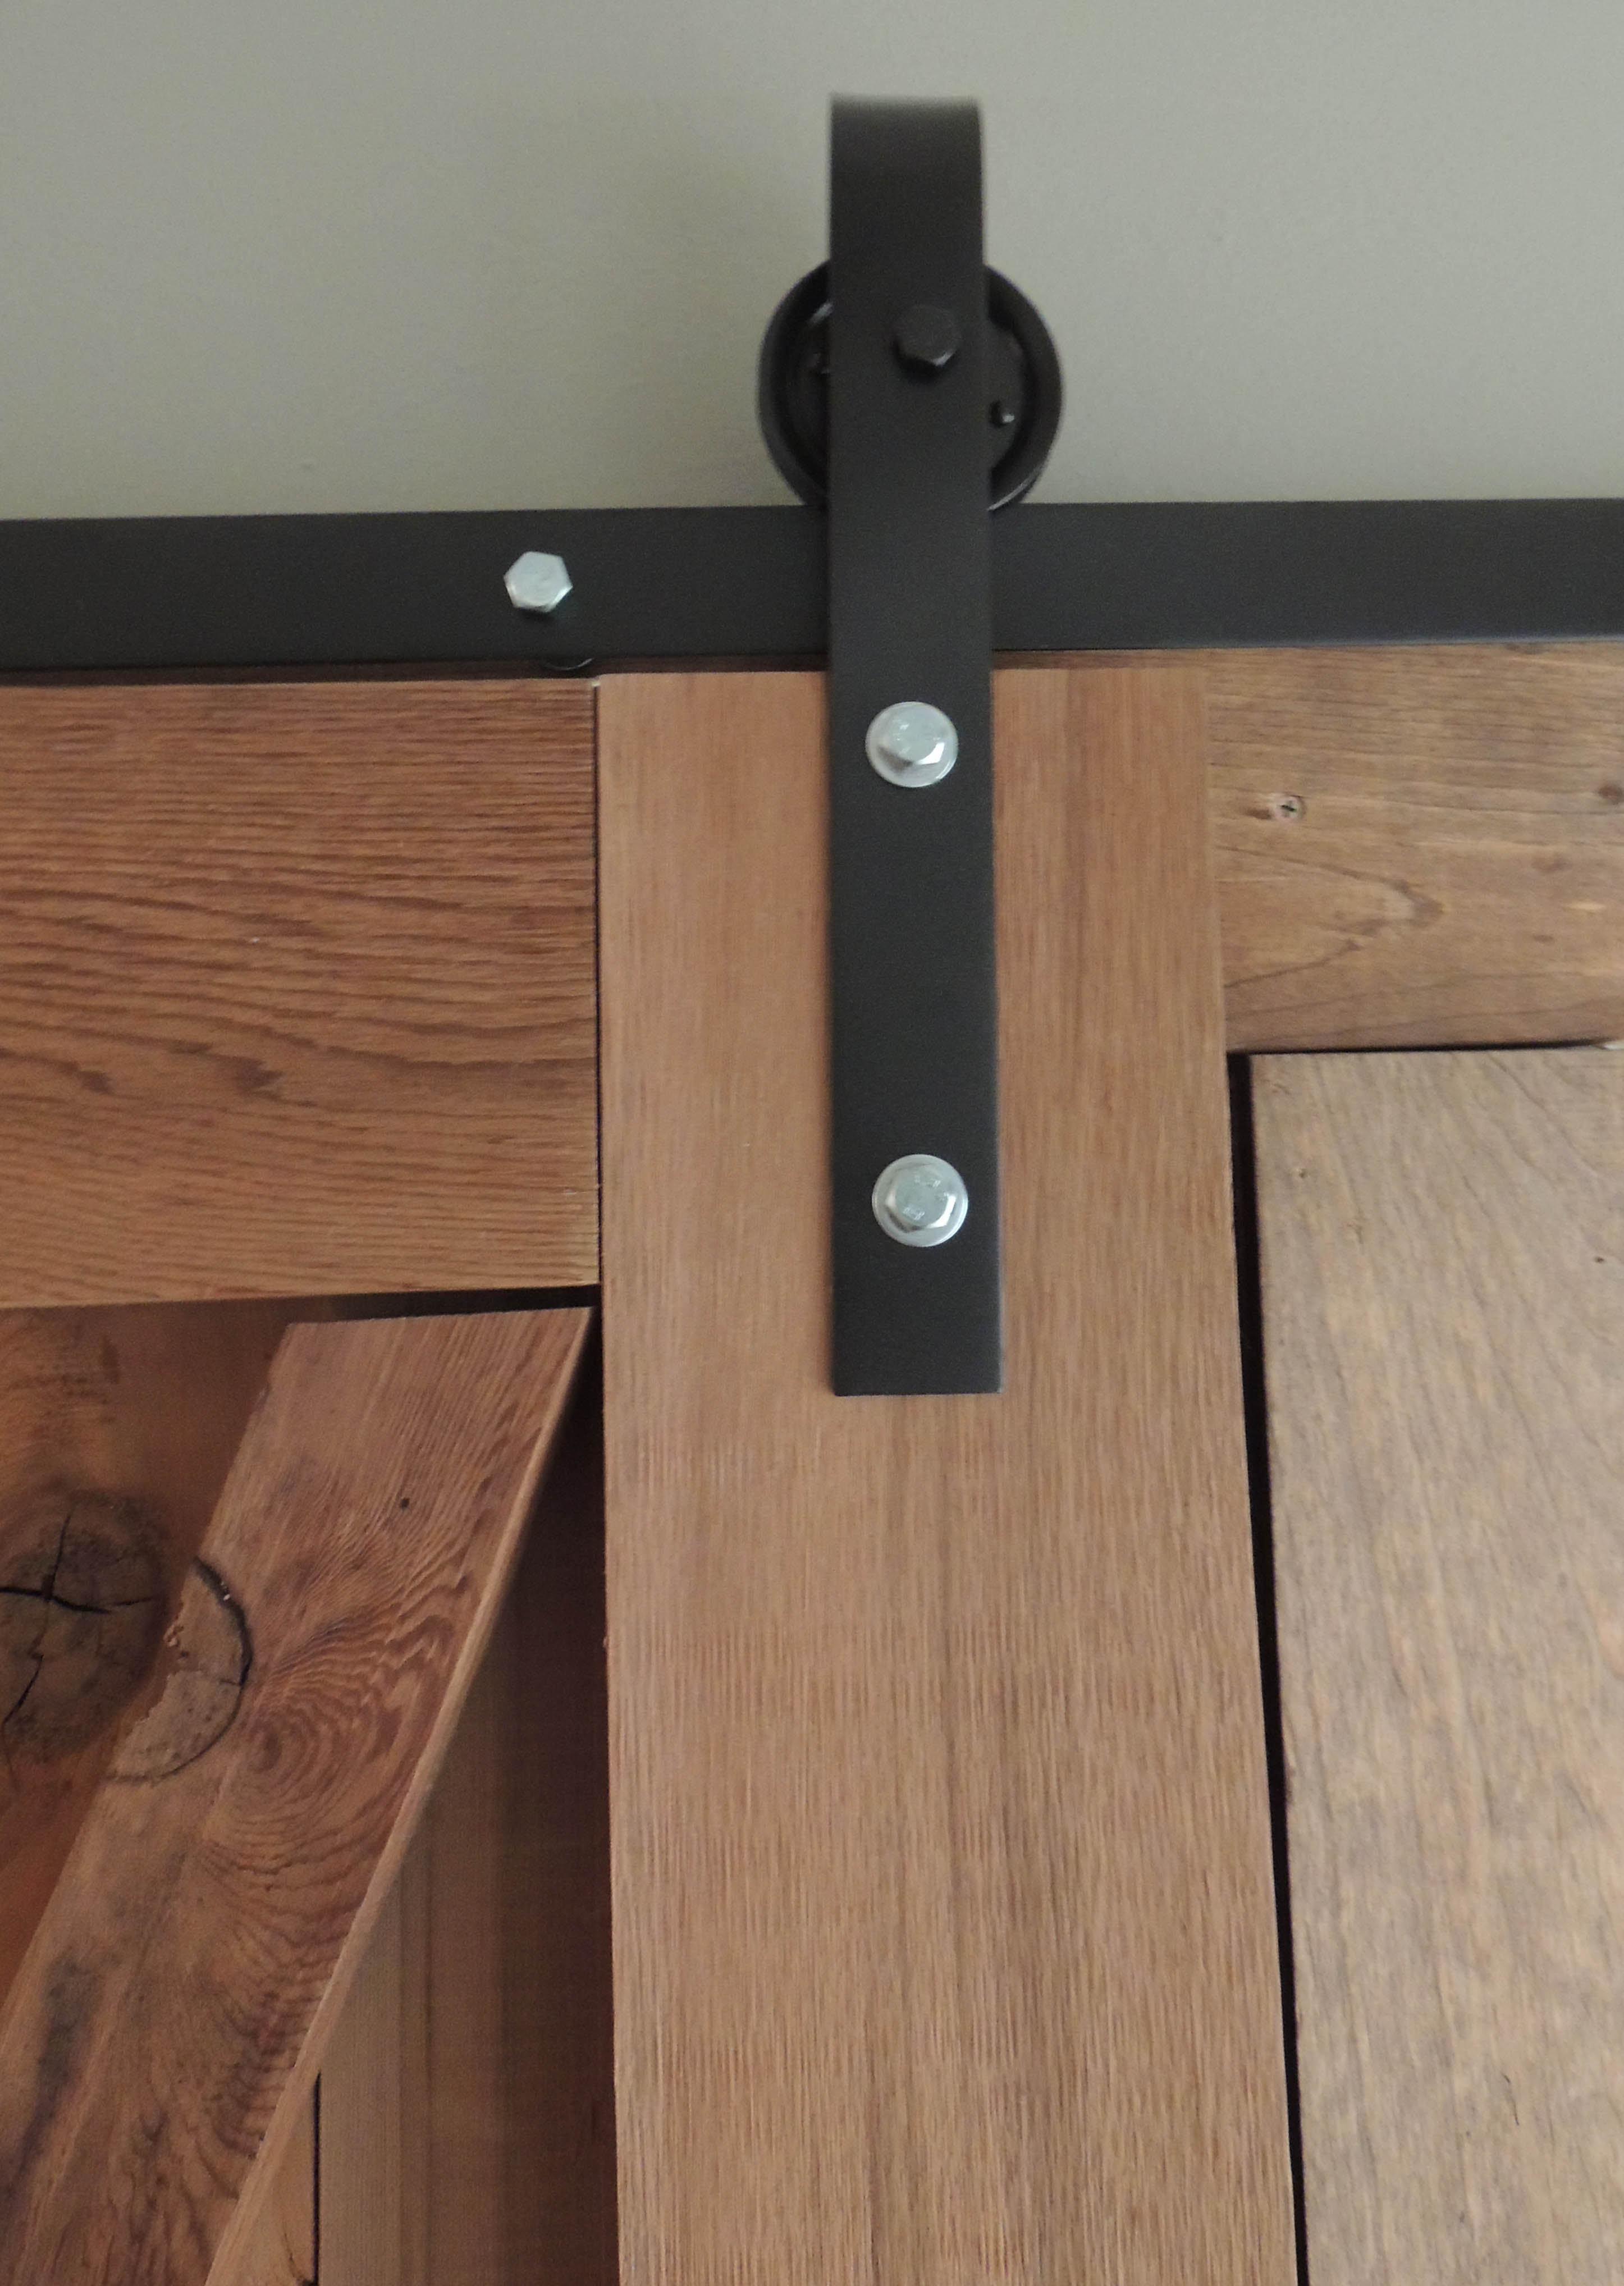
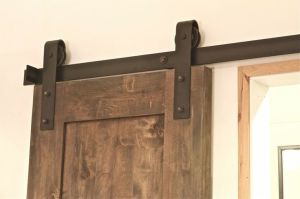
After pondering the configuration, I arrived at the conclusion that apart from fasteners, I’d only need two things, metal flat stock and pulleys. Now all I had to do was design, measure, cut, support, fasten, paint, and mount everything.

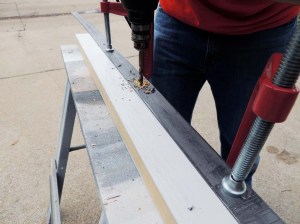
I decided the easy part was going to be the track. It didn’t need to be anything more than a straight piece of flat stock, but the problem was that it needed to be over 60″ long and most hardware stores only sell flat stock in 36″ lengths. Fortunately, though, there’s a small “oddity” hardware store around the corner from us, and they had exactly what I needed (I did get a 36″ piece from Home Depot for the brackets, though).

I suppose I should clarify what I’m talking about. “Flat stock” is basically a flat steel rod. For this application, I selected 1.5″ x .125″ (that’s 1/8…) mild steel. I chose this size because it would be thick enough to make a good track and wide enough to run bolts through. I went with mild steel over stainless steel because it’s cheaper, more malleable, easier to cut, lighter, and since I’d be painting it and it would always be indoors, corrosion won’t be an issue. A tip, though: wear gloves when handling carbon steel. It will get on you.

I now had my track piece, but it was too long. So I cut it using my miter saw with a metal-cutting blade. Apparently I’m also available for plumbing work:

DO or DIY | DIY Barn Door Hardware

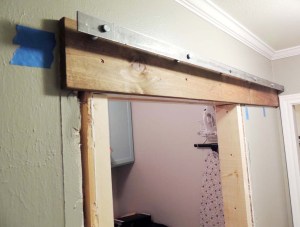
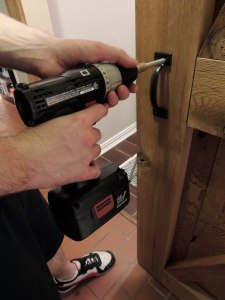
The next order of business would be to get it mounted up. Now, since this thing would be supporting the whole door all by its lonesome, it would have to be mounted to the studs in the wall. I figured out where all the studs where and then drilled holes accordingly through the metal.

DO or DIY | DIY Barn Door Hardware

Next, I mounted a 1×6 that would double as the top trim of the door frame as well as a bracket of sorts for the track. To ensure it would support everything, I made sure to mount it to the existing door frame as well as the studs.

The real trick here was how to mount the track to the board, but also still away from the board. I found some steel bushings at Home Depot that worked perfectly, so I selected some that were big enough to fit around the lag bolts I was using, and long enough to hold the door away from the wall.

DO or DIY | DIY Barn Door Hardware

DO or DIY | Barn Door Hardware DIY

DO or DIY | DIY Barn Door Hardware

And now for the obligatory “Greg Test” (coined after my uncle who the family always made stand on hand-built items by my Grandpa to make sure they wouldn’t crumble):

DO or DIY | DIY Barn Door Hardware

You know what they say, if it’s strong enough for pull-ups, it’s strong enough for a door.

OK, so now I had a door and something to hang it on… but never the twain shall meet. Yet.

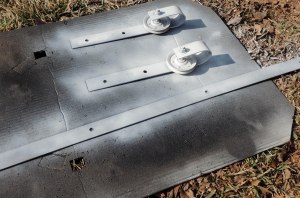
The brackets were a bit trickier, as they’d require more thought. Basically, you can make your door whatever height you want and hang the track however high you want, but it’s up to the brackets to make up the difference.

Of course, this required turning steel flats into… well, I guess they’re basically hooks. But there was still a minor problem: I had a brilliant solution for the brackets, but I really had no clue what I was going to do for rollers. I pondered many solutions with limited success. I thought about porch screen rollers but figured they’re be too weak. I considered A/C pulleys but figured they’d be too bulky. Heck, I almost went with drive belt rollers but they were too expensive.

Then, as if by some twist of fate, I was met with a barn door miracle: https://www.grainger.com/product/AMERICAN-GARAGE-DOOR-Cable-Pulley-5MVF4?functionCode=P2IDP2PCP. They’re technically cable pulleys for a garage door, but they were the perfect size and material for what I needed, with just the right diameter, groove, and even a look Julie liked. And for $7 for the pair, there was no way I could go wrong.

So now that I had all the pieces, I could get to work. After debating multiple designs, I decided that I didn’t want to mess with a ton of metalwork, so I went with a simple hook style, basically an upside-down “J”. The first calculation I needed to know was how far away from the track the pulley needed to be, as this would determine the diameter of the curve. The track was 1.5″ away from the wall, but I actually wanted to door as close to the wall as possible, but also wanted it to hang straight down. After measuring the thickness of the door, I decided it needed to be set back another inch from the track, putting it at 0.5″ away from the wall. And since the bracket would be mounted on the front of the door, I went with a 2″ diameter curve so that when the pulley was in the middle of the arc of the bracket, there would be 1″ of door behind it.

So, how do you measure a 2″ curve when bending steel? Easy. Just bend it around something you know it 2″, like an iron pipe nipple:

DO or DIY | DIY Barn Door Hardware

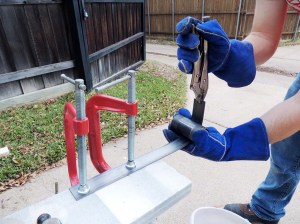
I should note here that the reason I’m wearing welding gloves is because I tried heating it up with a propane torch so it would bend easier. It didn’t work. MAPP gas might get hot enough to make it nice and bendy but at the time all I had was propane, and it just wasn’t hot enough. So I had to use vise-grips, a hammer, and some good ole-fashioned elbow grease to shape it around the pipe.
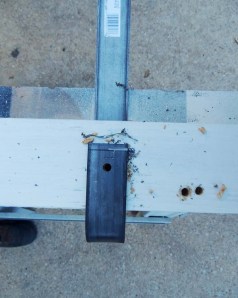
Almost there…

DO or DIY | DIY Barn Door Hardware

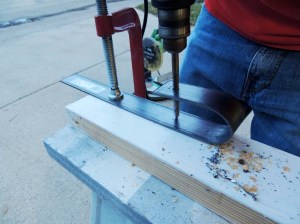
Once I got it all bent up, I needed to drill holes for the bolt that would act as the “axle” for the rollers. To do this, I just set everything up on some saw horses, measured where I wanted the hole, and drilled through both sides at once to ensure they were even.

DO or DIY | DIY Barn Door Hardware

DO or DIY | DIY Barn Door Hardware

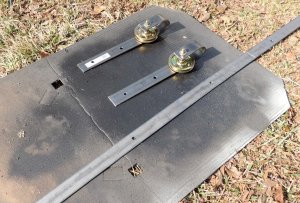
Once all the pieces were made, I just trimmed them down to even lengths and then primed and painted them in our typical oil-rubbed bronze.

DO or DIY | Barn Door Hardware DIY

DO or DIY | Barn Door Hardware DIY

So now that everything was bent, drilled, trimmed, and painted, it was just a matter of mounting everything up in the proper dimensions, which is really just measuring and doing some basic math.

DO or DIY | Barn Door Hardware DIY

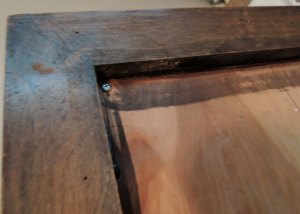
The final order of business was the trim. Remember where I tore the door trim off? Well, I replaced it with some simple 1×6 pieces that I stained to match the door. It’s the same wood that I used for the track support, so utilizing it as door trim gives form to a critical functional piece.

DO or DIY | DIY Barn Door Hardware

DO or DIY | DIY Barn Door Hardware

DO or DIY | Barn Door Hardware DIY

Materials

  • Flat stock- 1.5″x1/8″ mild steel: approximately $20
  • Stainless steel bushings: $5
  • Lag bolts and washers: $10
  • Pulleys: $7
  • 1×6 Lumber (for track support): $3
  • White Primer: $3
  • Oil Rubbed Bronze Spray Paint: $6
  • Door Handle: $1

Total hardware cost: $55, give or take. With LOTS of extra bolts!

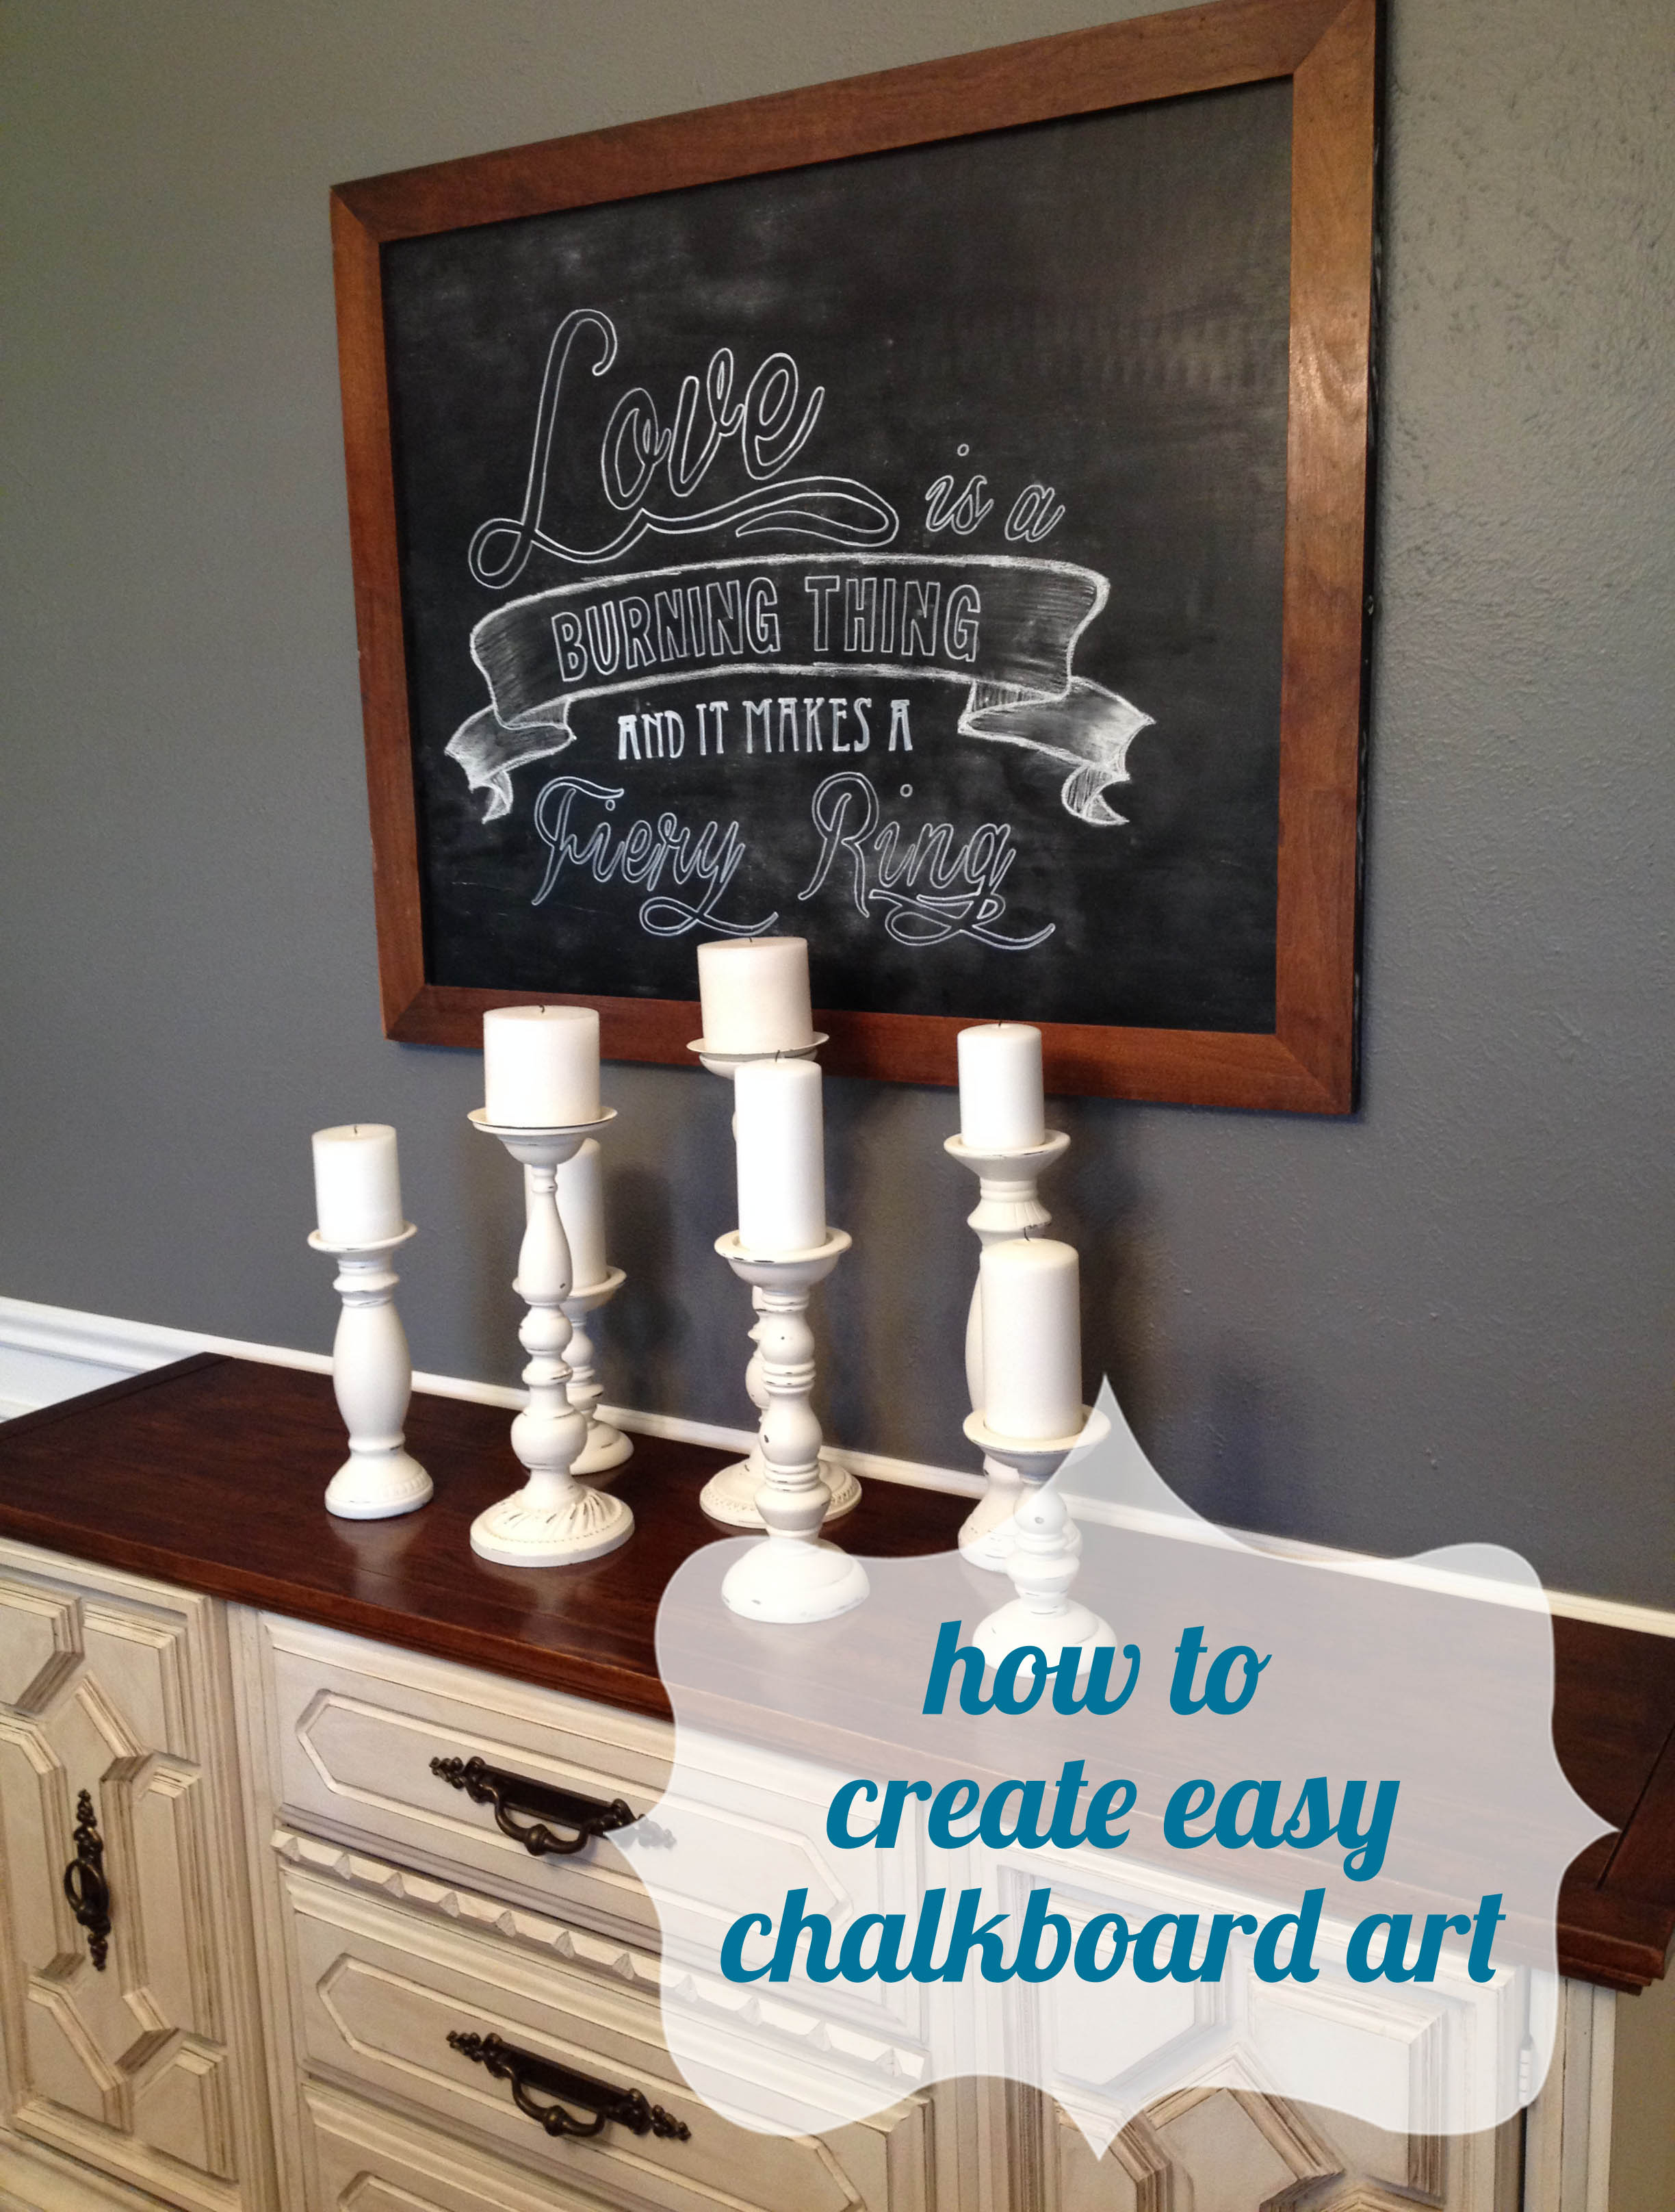
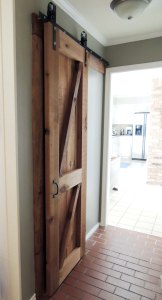
And, finally, the finished product!:

After.

DO or DIY | Barn Door Hardware DIY

DO or DIY | Barn Door Hardware DIY

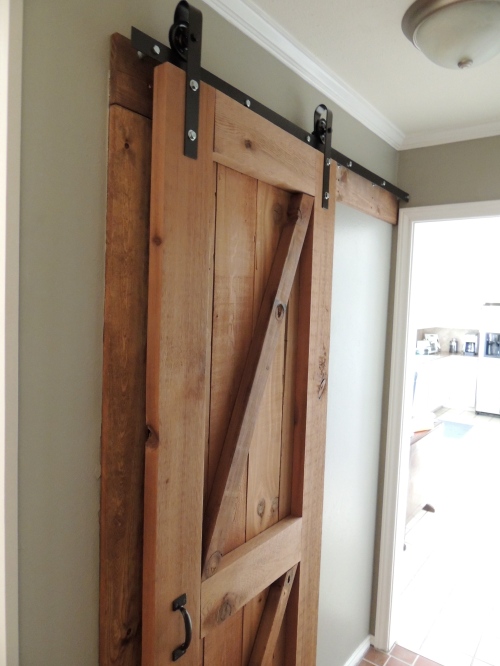
And again, here’s what the whole enchilada looks like…

DO or DIY | Barn Door Hardware DIY

DO or DIY | How to Build a Barn Door

35 Comments

Filed under Laundry Room

Chalk It Up to Johnny

DO or DIY | Easy Chalkboard Transfer Art Tutorial

Hers.

Confession time.  I suffer from a pretty severe fear of unnecessary nail holes, meaning I have a total inability in deciding what and where to hang things on the wall, which ultimately leads to some pretty bare walls in our house.  I’ve mostly hidden it from you all, thus far, but it’s time to come clean and fess up with picture proof.

Sigh.  Our dining room.  It is, by far, the worst offender.  I hung the beautiful painting Chris’ grandfather painted on one of the small walls by the window but, four years later, had still not made a decision on what to put on the largest wall above the buffet.  Now, for the big reveal… the corner of the dining room I’ve been avoiding to show you…

DO or DIY | Easy Chalkboard Transfer Art Tutorial

The walls haven’t remained empty all these years due to a lack of ideas.  About twice a month a light bulb would go off and I’d excitedely tell Chris all about my grand plans for that wall.  He’d nod and agree, I’m sure figuring I’d never commit and he was safe from any real work.

The real push finally came in the middle of my weekly “Fixer Upper” fix.  Anyone else obsessed with that show on HGTV?  It almost makes me want to move to Waco… until I remember suburbia already feels like the boonies to me.  In one of the more recent episodes, they framed a chalkboard for wall art in the dining room (see below).  Feel free to drool over those lanterns above the island with me as well.

DO or DIY | Easy Chalkboard Transfer Art Tutorial

Here’s a closer shot- ignore the creepy shot of the people.  While I’m confessing, I may as well share that this is a picture I took of my TV while this episode was airing so I would remember the idea.  I’d like to say this is the first time but it happens quite a bit… #nojudgments

DO or DIY | Easy Chalkboard Transfer Art Tutorial

Now while the idea of using a chalkboard for art isn’t novel by any means, there was something about the frame they used that got me thinking.  We had one pretty similar that we had scored for free a few months back.  I had used the mirror for something else and the frame had been laying around ever since.  I knew I had to find a use for it soon or else it would meet the fate of one of Chris’ garage purges.

The first decision I needed to make was whether or not I wanted this to be permanent.  While I love the idea of a chalkboard in theory, I have a few problems with it in reality.

1) I hate the sound and feeling of writing with chalk on a chalkboard.  Just thinking about it makes me shiver.  Yech.

2) I know way too many kids under the age of 10 (including two brothers with a sense of humor of about an 8 year old) to know that one look at a chalkboard and the art will be a distant memory.

3) I know myself enough to realize that I’ll spend a ton of time laying out what I want to say and how to write it that I’ll never want to erase it and start over.

So, the decision ended up being pretty easy- I was going to make a faux chalkboard with permanent art.

Next came the hardest part- figuring out what to write on it.  I filled up a whole Pinterest board of ideas and drove Chris crazy with showing him dozens of options on a daily basis.  Should I go with a food pun being that it’s in a dining room or maybe a cliche inspirational quote about homes, hearts, etc.?  I ended up deciding on song lyrics, something meaningful to us and something that could work in case I ever decided to move this into a different room.

And what screams “let’s dine in the fancy room” more than the man in black?  Well, maybe not, but one of Johnny Cash’s songs is pretty sentimental to us so the decision was made and away we went.

Now, get ready to have your mind blown.  This is seriously way easier than I ever expected it to be and I’m going to use this transferring trick all the time.  Once I finally figured out what I was doing and laid out the art, this took no time at all to complete.  Here are the six easy steps to transferring a printed image and pulling off a chalkboard look.

Materials Needed:

  • Plywood
  • Flat black paint (or chalk paint for erasable option)
  • Fine tipped white paint pen (or chalk for erasable option)
  • Chalk
  • Ballpoint pen
  • Printed piece of artwork
  • Tape

Step One: Cut a piece of plywood down to the size desired and paint with flat black paint.  Again, I wanted something permanent but you could also do this with chalkboard paint if you wanted something erasable.  I ended up painting two coats for an even look.  I left it overnight to dry completely.  Pre-paint tip: sand the plywood thoroughly for a smooth surface- I used two different grit sandpapers to achieve the smoothest finish.

DO or DIY | Easy Chalkboard Transfer Art Tutorial

Step Two: print out your artwork.  You can print it on any printer- black/white, color, laser, inkjet, anything.  I wanted a pretty big piece so I had to print my artwork in a panel fashion then tape together.  If you want to be really fancy, you can print it on one oversized piece of paper at a copy shop but paneling and piecing together works just fine- you’re not keeping the paper anyway.

DO or DIY | Easy Chalkboard Transfer Art Tutorial

Step Three: With the side of a piece of chalk, rub the back of each piece of paper and retape it to the board in the final pattern desired.

DO or DIY | Easy Chalkboard Transfer Art Tutorial

Step Four: With a ballpoint pen, trace the lines of the artwork.  Press pretty hard so the image transfers clearly.  I used a red pen so I could see where I had traced.

DO or DIY | Easy Chalkboard Transfer Art Tutorial

DO or DIY | Easy Chalkboard Transfer Art Tutorial

Step Five: After tracing the full piece, remove the paper.  You’ll see faint white lines on the board that will serve as a guide for this step.  Using a fine tipped white paint pen (or piece of chalk if you want to keep it erasable), trace over those transfered lines for a clear image.  Tip: I removed the papers one by one and did this in stages so I didn’t accidentally smudge the lines with my palm as I traced.

DO or DIY | Easy Chalkboard Transfer Art Tutorial

DO or DIY | Easy Chalkboard Transfer Art Tutorial

Step Six: You’re almost there!  To make it really look like an authentic chalk board, rub the side of a piece of chalk across the board and smooth with your hand for the chalked background effect.

DO or DIY | Easy Chalkboard Transfer Art Tutorial

Boom.  Chalkboard art!  I really don’t know why I waited so long to do this.  This was seriously one of our easier (and quickest) projects!  It makes me want to do it again… and again… Hey, Chris, what do you think about a full wall of chalkboard art?  Muhaha.

His.

Confession time. I hate country music. Actually, that’s not much of a confession. Anyone who knows me knows that, as Joe Dirt would say, “I’m a rocker, dude, through and through!”  It all sounds like twangy complaining intertwined with shout-outs to step mommas, guns, and trucks, and I find it really irritating- the exception, of course, is Johnny Cash. While I’d consider his style more in line with rockabilly, he is widely regarded as the godfather of country music, and he’s one of everyone’s favorite artists. In fact, I don’t know anyone who doesn’t like at least one Cash song, and frankly, I wouldn’t trust anyone who didn’t.

The song he is most renowned for is, by far, Ring of Fire. While there is some controversy surrounding when, why, and by whom the song was originally written, there is no question that it’s proven to be one of the greatest and most unique love songs ever written. And it’s awesome. So when Julie came to me with the idea that it be immortalized in our dining room, I was totally on board.

Now, here’s the problem: she wanted to do a chalkboard. Last time we did a chalkboard we ended up going for a ride on the failboat, so I was hesitant to give in. After some debate, though, we decided that since we wanted the piece to be permanent and only look like a chalkboard, we could get away with using regular paint. The best part of this project, though, is that Julie had saved an old frame from some other project that had gone awry (why, I’ll never know) and we were finally going to get it out of the garage (it had only gotten in my way EVERY time I tried to do ANYTHING in there)!

Now, making a fake chalkboard is actually pretty easy. The frame originally housed a mirror and had a piece of plywood over the back, so I just pried off that piece and cut it down to size to fit inside the frame. Next, I primed one side and painted it black. We had some weird amalgamation of various sheens of black paint that we decided to use, and we BARELY had enough for two coats… but since the whole thing was getting smeared with chalk anyway, we figured any thin spots would be covered up.

The final order of business, once the art was actually transferred onto the wood, was mounting the wood in the frame. Since the wood was actually a different thickness than the mirror had been, we weren’t able to reuse the same mounting tabs. So, being the lazy fellow that I am, I just ran some short screws into the backside of the frame overlap:

DO or DIY | Easy Chalkboard Transfer Art Tutorial

Boom. Fake chalkboard.

After.

DO or DIY | Easy Chalkboard Transfer Art Tutorial


DO or DIY | Easy Chalkboard Transfer Art Tutorial


DO or DIY | Easy Chalkboard Transfer Art Tutorial

Hers.

I’d like to say I’m on the path to “empty wall syndrome” recovery but I have quite a few walls left to go.  At least one room has finally been conquered.  And here’s a fun picture I dug up.  Here’s where the room started when we first bought the place (the furniture in the picture was the seller’s before we moved in).  And for those of you who haven’t heard the story of that fabulous leopard print/black fringe chandelier, catch up here.

DO or DIY | Easy Chalkboard Transfer Art Tutorial

3 Comments

Filed under Dining Room, Easy DIY Projects

When the Wife’s Away, the Hulk Will Play

DO or DIY | How to Build a Barn Door

Hers.

Here’s the story of what happens when I go out of town for a few days, leaving Chris behind.  When having a spare weekend without the ole ball and chain, some husbands call up their friends for an epic guys’ night, some commandeer the TV for a 24/7 Sports Center marathon (sadly, I know that’s a thing as my brothers would watch the same episode of SC over and over again until they could parrot it back), and some may even decide to go on their own trip to hunt, camp, or some other bug-infested, manly activity that makes wives shudder at the thought.

So, what does my husband do?  Something a tad different.  He turns into the Extreme Home Hulk-Over… aka goes into full demo mode.

Yup, Chris went all super-Hulk on our laundry room.  And he felt the best way to warn me of his work was with the below text.  Husbands, listen up, here’s how not to break the news to your wife that you’ve gone rogue.

photo-1_v2

Yes, it appears that we were about to venture into phase 2 of the laundry room makeover (um, I didn’t quite realize we even needed a phase 2 but apparently I was wrong).  But let’s catch you up a little, shall we?  We revealed our dramatic laundry room makeover nearly a year ago (read more here).  Short version?

We went from this:

To this:

Ah, and of course my dirty little secret stash hidden behind the door.

The door always stayed open for two reasons- 1) to easily unload the dryer which was a front loader and 2) so Chloe, our cat, could easily access her litter box which was in the right-hand corner.  This drove Chris N-U-T-S- he wanted that door closed so it would help contain the machine noise and Chloe’s less-than-stellar smelling litter.  He even proposed we cut out a doggy door so we could close the door and Chloe could still get in.  Um, no, honey, we’re not installing an interior doggy door.  I’m pretty sure that would automatically lump us in with the crazies on Animal Hoarders (no lie, I recently saw an episode that had a doggy door installed between each room of the house so the cats didn’t have to be inconvenienced by walking out of one room, down the hall, into another room… who does that?!).

So the door stayed as-is until… (fast forward to me being out of town) Chris installed our new washer/dryer set and discovered that the new dryer stuck out further and was impossible to access with the door open.

As I’m enjoying my trip and the free limo involved, my phone is being bombarded with DIY SOS’es.  Husbands, daily lesson #2 for you: seriously, don’t mess with your wife’s free limo time.

DownloadedFile

I’ll give you one guess on if you think he left it alone until I got back…

Well, here’s the first thing I saw leaning against the back of our house upon my return.

DO or DIY | How to Build a Barn Door

And this site greeted me in the house.

DO or DIY | How to Build a Barn Door

DO or DIY | How to Build a Barn Door

Sayanora door, it’s been nice knowin’ ya.

Because I know my husband and pretty much knew I’d be coming back to a doorless laundry room, I started digging into a potential solution.  No way was I going to leave the space open.  As cute as our teal cabinets are, I wanted to be able to close off this space.  Chris suggested a bifold door but I’m not the biggest fan of bifolds and I knew it would still drive Chris crazy because I’d still never close it due to Chloe.

And then a genius idea struck.  Finally, a way to put all those barn door inspirations I pinned on Pinterest to good use!  This would be the perfect space for a barn door!  It would slide across a track on the exterior so I could leave it open a crack for Chloe to get in and it would be a huge statement piece for that hallway.

Source: The Accent Piece

Source: Design Dump

Ah, such beauty.  We had a plan and were off!

And then I discovered how much barn doors were aaand Chris hit the brakes on the project.  He wasn’t too keen on dropping $500-700 on an old busted up door that he claimed anyone could just build.  “But it’s so full of character!” I argued.  That didn’t get me too far.  It was time to switch tactics.

“Well, hon, if anyone could just build it, why don’t you?”  Bingo.  But I wanted a barn door as genuine as possible (even if it wasn’t originally intended for a barn) and that meant genuine barn wood.  If you haven’t priced out barn wood lately, let me catch you up on how expensive it’s become.  Expensive as in $8.  Don’t make the mistake I did- assuming it was $8 a board.  I grabbed a few and started to check out at our local architectural salvage shop, only to discover that they were $8 per LINEAR FOOT, not per board.  Womp womp.

DO or DIY | How to Build a Barn Door

We did find an awesome deal on reclaimed cedar planks, however (seen on the far left of the above picture).  Meh, close enough… especially considering it was only $1/foot (which ended up being $8/board).  Not too bad considering they sell new for $15 per board at home improvement stores.

And now for Chris to work his magic and convince me that building a barn door really wasn’t all that tough.  We’ll see, Hulk, we’ll see.

His.

If you read this blog regularly, you know my feelings toward doors: they make me angry. And you wouldn’t like me when I’m angry. Sometimes I want to study quantum physics just so I can try to invent a way to eliminate the need for them entirely.

Now, by far the stupidest door in our house was our laundry room door. It was a 30″ door in a 10 sq. ft. room. For the conversion-impaired, that means that the space required for the door to swing open was 25% of the room. 25%! What idiot drew up those plans and thought, “yeah that’s an acceptable thing”? Now I understand that the doorway has to be a particular width in order to be able to fit the laundry machines in, but it’s clearly not a room where a hinged door is a sensible solution.

For a while we were somewhat content to just leave the door open, but our machines operated somewhere just shy of permanent hearing loss noise levels and the cat’s “business” can often be detected three counties away. It wasn’t until my parents gave us their old machines (thanks, Mom and Dad!) that a solution was actually required- the new machines’ plumbing cause them to stick out much further into the room, and since they’re both front-loaders you couldn’t even get them open. So now we had yet another problem with this door, and this time a solution really couldn’t wait but since the decision-maker was out of town, I had no choice but to rip it off the hinges.

Fast forward a few days and we stood in front of the doorway, pondering our newfound dilemma. The more I thought about it, the more I realized just how many sensible options the builder had: a pocket door, bifold doors, double doors, etc. But, of course, they went with the option that minimized usable space in the room. And to make matters worse, every reasonable alternative I could think of would require major “modifications” to the wall, and frankly I’d rather have no door than to have to replace a wall.

And then it hit me: a barn door. Julie has been droning on for a few years about how she “dreams of having a barn door someday,” so getting her on board was a cinch. At the time I didn’t know much about barn doors but I had seen a few pictures and they looked simple enough, plus I know that in the old days a farmer would have probably built his own barn and wouldn’t waste much time on perfecting a door, so it couldn’t possibly be that complicated.

And it’s really not.

For the most part, a barn door is just a bunch of square cuts nailed together in specific dimensions. Julie picked out some antique siding that I planned on using as the “background” of the door, but after seeing the prices they wanted for actual antique barn lumber (something like $8 per linear ft…. yeah, right), I convinced Julie I had a much better solution: cedar.

I guess it’s intended for pergolas and fences, but these 2x6x8 boards were the perfect fit for our project, having just the right level of “rawness” to pull off the look we were going for, but were still quality cuts that were easy to work with. And for $8/ea they seemed like a steal:

DO or DIY | How to Build a Barn Door

The only problem with these is that they can vary pretty wildly in color, and we needed three pieces that not only matched each other, but also matched the antique siding we bought. So I crawled around the lumber section showing Julie board after board trying to find a winner. The kid working there kept asking if we needed help, but frankly I think we’re beyond help with these things.

Approximately one eternity later, we had all the pieces we needed for the project. I cut two of the 2×6 cedar pieces to the overall height of the door, which for this application was 7′ (we had fairly thick trim that we wanted to cover). For the cross pieces, I just cut three pieces of uniform length. I was building a door that was 30″ wide, so the cross pieces were 30″ – 2x the 2×6 width (remember, 6″ is the width of a 2×6 BEFORE it’s milled, so it’s usually closer to 5.5″). Obviously two of the cross pieces went at the top and the bottom, but there was a bit of a debate as to where the middle piece would it go: the geometric middle, or the height at which the handle would go, which was bascially 1/3 the total height of the door. Well, we ultimately agreed that an asymmetrical look was what we really wanted, so the middle piece went at 1/3 the overall height of the door.

DO or DIY | How to Build a Barn Door

To put everything together, I used two types of brackets, 90* on the backside and straight brackets on the top and bottom:

DO or DIY | How to Build a Barn Door

DO or DIY | How to Build a Barn Door

Why the 90* brackets, you ask? Well, I didn’t want any pieces to sag over time; using a 90* bracket ensures that the downward forces are applied at an angle rather than straight down, reducing the risk of any separation at the seams. The straight brackets at the top and bottom were for added rigidity, especially when moving the door around during construction.

Next, I had to put the siding together across the back of the door to created the “background” for the barn look. The only difficult part of this was that I was actually assembling it atop a pair of sawhorses and everything was technically upside down. I glued everything down with wood glue (which was probably overkill) and then finished it off with my trim nailer:

DO or DIY | How to Build a Barn Door

DO or DIY | How to Build a Barn Door

So now I had a pretty basic door. The wood was rough so we sanded it down to avoid splinters:

DO or DIY | How to Build a Barn Door

Unfortunately, I wasn’t done quite yet. Julie also wanted a diagonal piece, so I used a cedar 2×3 and traced out the angles across the door sections:

DO or DIY | How to Build a Barn Door

So, put it all together and what do you get? A barn door! That isn’t from a barn…

DO or DIY | How to Build a Barn Door

Here’s a breakdown of all the pieces that went into it.

image_8_map

Supply and Cut List:

  • Two 2×6 cedar boards – cut to 7′ long for the sides. Purchased two at $9.97 each.
  • Three 2×6 cedar boards – cut to 19″ long for the top, bottom, and middle. Purchased one board to cut three pieces from at $9.97 each.
  • Two 2×3 cedar boards – used for the crossbeams. Purchased one piece  to cut two pieces from at $3.97 each.
  • Four old cedar siding planks – cut to 7′ long to make up the base of the door. Purchased four planks at $1/linear foot or $8 each.
  • Four right angle brackets – to hold the side boards to the top and bottom boards.
  • Two T-brackets – for center board.
  • Four straight brackets – two for the top board and two for the bottom.
  • Wood glue – already had on-hand.
  • Nails – already had on-hand.
  • Handle. $3.28.

Cost Breakdown:

  • Wood: $65
  • Brackets: $5
  • Handle: $3
  • Total: Just under $75

Click here to watch the sparks fly as I twist raw steel into some sweet custom barn door hardware!

After.

And here’s where we tell you how the door debate is now over.  Right?  Not quite.

Here’s the door when Julie passes through.

DO or DIY | How to Build a Barn Door

And here’s the door when Chris passes by.

DO or DIY | How to Build a Barn Door

It gets quite the workout.

DO or DIY | How to Build a Barn Door

Good thing it looks just as good closed as it does open.

DO or DIY | How to Build a Barn Door

DO or DIY | How to Build a Barn Door

And here’s a reminder of where we started.  Pretty amazing how one door can transform a space so dramatically, huh?

DO or DIY | How to Build a Barn Door

Stay tuned for the breakdown of the door hardware and track build!

38 Comments

Filed under Laundry Room

Trash Talk

DO or DIY | How to Make a Pull-Out Trash Cabinet

Hers.

It’s time to get trashy in the kitchen, people.  No, not as in “let’s decoupage the cabinets with faces of kittens.”  I’m talking about the age old kitchen question of where to stash the trash.

On day 1 of move-in, we put a trash can on the end of the kitchen counter by the breakfast nook and there it stayed for the next three years.  Not that we loved it being the first thing anyone saw when entering the kitchen, but we just had no idea where else to put it.

DO or DIY | How to Make a Pull-Out Trash Cabinet

For a small family unit of 2, we go through a lot of trash, even after sorting recycling.  There was the option of downgrading to a smaller can to put under the sink or in the pantry but I knew we’d never have a successful marriage because I’d be saying, “Chris, can you take out the trash” more often than “Honey, can you take care of dinner tonight?”… (which is already pretty common).

I found the perfect solution while perusing Pinterest the other day.  Why yes- let’s just build a pull-out trash cabinet!  I could find a medium-sized trash can and just tuck it away behind a cabinet door when I didn’t need it.  Genius!

pull out trash cabinet

Source: Schrock 

pull out trash cabinet

Source: Houzz

I even knew exactly which cabinet I could sacrifice for this purpose too.

DO or DIY | How to Make a Pull-Out Trash Cabinet

This cabinet never had an interior shelf and was an odd size for normal kitchen storage but would be the perfect space for a hidden trash can!

DO or DIY | How to Make a Pull-Out Trash Cabinet

I knew it was meant to be because we even had a pair of drawer slides leftover from our pantry project (catch up on the pantry project here).

We purchased the drawer slides for $5.99 each here (they’ve worked perfectly on the pantry since we installed them nearly 2 years ago, by the way.  We highly recommend them as a super cost effective solution for pull-out shelving!).

With the solution in mind, I turned it over to the execution department (hm, maybe another term is in order so it doesn’t sound like I turn our projects over for beheading).

His.

Growing up, there was a constant battle between my parents about where to put the trash can: my dad wanted it in a convenient area in or around the kitchen, but my mom wanted it completely out of the house. Their compromise was to keep it in the laundry room, which was technically halfway between the kitchen and the back door. Somehow, though, the battle ensued once again after I moved out, and the trash is always in a different location every time I visit.

Fortunately, though, Julie and I never had such a conflict; we both tend to be a bit lazy, so keeping the trash anywhere outside of the kitchen was definitely not an option. There also wasn’t really anywhere in the kitchen to keep the trash can, so… out in the open it stayed. We did, however, put another trash can in the garage so that we could dispose of the “funkier” items so as not to stink up the house. This system worked quite well for about three years until one Saturday afternoon, the inevitable happened: Julie changed her mind, and now she wanted somewhere to hide the trash. Lucky me.

It turns out, though, that luck was actually on my side for this one, as Julie had already decided where she wanted it and I already had everything I’d need, which was really just some wood and some sliders, all of which I had leftover from previous projects.

The first step was to get the sliders mounted inside the cabinet. I cut some strips out of plywood (I needed thin wood) and screwed it to the inside walls.

DO or DIY | How to Make a Pull-Out Trash Cabinet

Next, I mounted the sliders to the wood, making sure the two sides were level and even with each other:

DO or DIY | How to Make a Pull-Out Trash Cabinet

Next, I cut down some 1/2 x 4 wood pieces and mounted the inner slide piece to them:

DO or DIY | How to Make a Pull-Out Trash Cabinet

DO or DIY | How to Make a Pull-Out Trash Cabinet

Initially I tried spacing everything out and making a box so I’d have a cross piece to mount to, but it turned out to be a huge pain to get the widths right, so I gave up and removed the front and back piece, and just mounted the cabinet door directly onto the sliding wood pieces.

DO or DIY | How to Make a Pull-Out Trash Cabinet

Once everything was done, we had an issue of the door slowly sliding open when it began to become weighed down with trash, so I needed some sort of latch that was easy to open but also stayed out of sight. My solution was a magnetic catch, which was just a metal tab mounted to the door that would stick to a magnet mounted inside the cabinet:

DO or DIY | How to Make a Pull-Out Trash Cabinet

DO or DIY | How to Make a Pull-Out Trash Cabinet

Next, I reused the original cabinet pull and just lined it up with the drawer pull above it:

DO or DIY | How to Make a Pull-Out Trash Cabinet

Then I had to patch and paint the holes from the old pull location and nail gun:

DO or DIY | How to Make a Pull-Out Trash Cabinet

DO or DIY | How to Make a Pull-Out Trash Cabinet

Boom. Trash cabinet.

Materials Needed:

  • Drawer slides, $5.99 from eBay
  • 1/4″ Plywood – 2 strips, already had on-hand
  • 1/2″ x 4″ Lumber – 2 pieces, already had on-hand
  •  Magnetic catch, $1.28 from Home Depot

Price: Since we already had the wood leftover from previous projects, this came out to a grand total of $7.27.  Not too bad for some trash.

After.

DO or DIY | How to Make a Pull-Out Trash Cabinet DO or DIY | How to Make a Pull-Out Trash Cabinet

Now you see it.

DO or DIY | How to Make a Pull-Out Trash Cabinet

Now you don’t!

DO or DIY | How to Make a Pull-Out Trash Cabinet

4 Comments

Filed under Easy DIY Projects, Kitchen

Furniture Flip Friday: Feeling Blue

Hers.

After refurbishing a slew of dressers, we were desperate for a change.  It was then that we found this old, solid wood desk for a great price.  Bingo.  If anything was going to cure our dresser monotony, this would be it.

It had dovetail drawers (always a bonus) and was in great shape.  We started cleaning it out and, much to our surprise, found old papers stuffed behind the drawers.  Ironically enough, there were a list of addresses from Tennessee, a few were even from the small town Chris’ maternal family was originally from- such a small world!

As much as I love my standard antique white color scheme with oil-rubbed bronze hardware, I knew this desk needed some spice.  And what’s spicier than blue drawers (besides those jalapeno poppers that still haunt my taste buds…).

Painting just the drawers blue gave the desk a cute pop of color without looking too over the top.  The best part was, this ended up being the cheapest design decision I’ve made to-date.  I found the perfect shade of light blue sitting in the oops paint pile at Lowe’s.  I knew I only needed a little (I’ve actually used this paint for drawers on two different desks now and still have some remaining) so the little sample jar was perfect.  It’s an Olympus satin paint and, unfortunately, I can’t tell you the name because it was a custom mix and mixed, apparently, incorrectly.  And, yes, you’re reading the lid correctly; it was a grand total of FIFTY CENTS!  After Chris got over the initial shock, a long bout of gloating started as apparently it was thanks to his “good influence rubbing off on me.”  Ha!

DO or DIY | Desk Transformation

It ended up being the perfect color for this though!  For simplicity sake, we sprayed the whole desk (except the drawers and top) antique white and then I used a brush to paint the drawers blue.

I lightly distressed all the edges of the desk and drawers because, well, let’s be honest, I have an addiction to my sander.  It also helped give the desk that cute shabby, vintage look.

Voilah. Blue drawers.

DO or DIY | Desk Transformation

We decided to go with a stained top for this piece so we stripped the original stain and applied Minwax’s Special Walnut stain.

The hardware got a spray of oil-rubbed bronze paint to finish it off.

My favorite part of this desk, obviously, was the blue drawers but the paneling on each side of the desk was a close second.  I’m not going to lie- this was a hard piece to give up, even though we already have a desk and not one I’m going to let go of anytime soon (see pics of our current desk here).  Chris had to talk me out of keeping this new desk once… or twice… okay, maybe 10 times.  It ended up going to a woman decorating her new office space.  I swear the woman was Sarah Jessica Parker’s doppleganger so at least I can take comfort in the fact that Carrie would be proud (Chris + all men out there: that’s a Sex in the City reference).

Transformation Breakdown:

  • Base Paint: Antique white
  • Drawer Paint: A custom pale blue color
  • Top Stain: Minwax, special walnut
  • Hardware: Oil-rubbed bronze

After.

As a reminder of where we started, here’s the before again.

DO or DIY | Desk Transformation

And after…


2 Comments

Filed under Furniture Flip

Furniture Flip Friday: Wake Up and Smell the Coffee Table

His.

Sometimes waking up early on a Saturday pays off. For example, a few weeks ago I was awoken at the ungodly hour of 10am and was unable to fall back asleep, so I decided to peruse Craigslist, particularly the free section, when… huzzah! Free coffee table! If you’ve ever tried to nab something for free on Craigslist, you know you have to act fast. So I immediately e-mailed the person and asked if it was still available. Well, my “early rise” had paid off as I was the first one to contact them, but I had to be able to get there within 30 minutes. I quickly threw clothes at Julie and dragged her out of bed screaming, “no time to explain, get in the car!” In retrospect she probably thought the zombies had finally come and it was time to bug out. No matter, we had a coffee table to race to!

Well, we got there and picked up the table just in time to beat the rain. It was covered in dust and wasn’t particularly pretty but it was solid wood and it was free, so we weren’t really going to complain. Once we got home and got it cleaned up, we found out it was made by Lane, a rather reputable wood furniture company.

So here she is, in all her 80’s glory:

DO or DIY: Farmhouse Coffee Table Refurb

DO or DIY: Farmhouse Coffee Table Refurb

So it really wasn’t half bad. I mean, it wasn’t really half good, either, but we had something we could work with. We decided to do our typical antique white finish with a stained top. The wood had a really rich grain but definitely needed a fresh stain.

The first thing I did was paint the legs and bottom shelf white. Simple enough, but thinking back on it I probably should have stripped the top first because I got some old stain gunk on the fresh paint job and had to do a lot of touch-ups. Oh well, live and learn, right?

DO or DIY: Farmhouse Coffee Table Refurb

So once the paint was cured, I stripped and sanded the top, similar to how I redid our front door (read more here). Some of the old stain and poly was really on there, so it ended up being pretty time consuming:

DO or DIY: Farmhouse Coffee Table Refurb

DO or DIY: Farmhouse Coffee Table Refurb

DO or DIY: Farmhouse Coffee Table Refurb

Finally, the top was ready for stain. We went with Minwax Special Walnut because a) we already had it and b) it’s a rich color that isn’t so dark it hides the grain.

DO or DIY: Farmhouse Coffee Table Refurb

After a good coat of stain and about four coats of polyurethane (the more coats you use, the more even it will turn out), we had a coffee table looking so good that… you guessed it, Julie wanted to keep it! It turns out, though, that it was a pretty easy argument to win, since our current coffee table was built by my grandfather and will never be replaced. Oh, and the thought of a 100% profit piece had Julie seeing dollar signs and new shoes.

Transformation Breakdown:

  • Base Paint: Antique White
  • Top Stain: Minwax Special Walnut

After.

DO or DIY: Farmhouse Coffee Table Refurb

Quite the difference!  Now, for more after pictures.

DO or DIY: Farmhouse Coffee Table Refurb DO or DIY: Farmhouse Coffee Table Refurb

2 Comments

Filed under Furniture Flip

Furniture Flip Friday: The Dresser I Barely Saved

Hers.

You may remember that our last Furniture Flip Friday post told the unfortunate tale of the parting of my beloved dresser (read more here).  Well, Chris owed me and it didn’t take long for me to collect.

Introduce what almost became another sales victim.  Yes, yes, it looked very generic and honestly, pretty ugly.

DO or DIY | Tall Dresser Transformation

The key is seeing past all the outdated stain and hardware and finding pieces with good lines.  I mean, look at the detail in the feet and, while the shell applique is atrocious, I knew it’d make for great detailing once painted.  It was a great find at only $35 too, especially for a solid wood piece!

DO or DIY | Tall Dresser Transformation

But I knew this dresser was a keeper when it spoke to me.  Yes, I had myself a dresser that could communicate.  Don’t believe me?  Psh, well non-believers, don’t you worry.  I have proof.

DO or DIY | Tall Dresser Transformation

Such profound words that appeared on the inside of one of the drawers.  Was it a question, a declaration, or just a weird come-on?  Well, we may never know but you better believe I was “feelin it” as a keeper for my house.  Sorry Chris, this one’s staying.

Still having a hard time seeing the potential?  Chris definitely was so let’s walk through the transformation.

First we (err… Chris) sprayed the base (drawers out) with primer then two coats of an antique white color.

DO or DIY | Tall Dresser Transformation

Then the drawers.

DO or DIY | Tall Dresser Transformation

Here’s a trick for you.  To help keep the drawers upright, we place one brick against the underside of the drawer and another one on the back inside of the drawer.  Fancy, I know.

DO or DIY | Tall Dresser Transformation

Next up, hardware.  17 in all, phew.  We chose to spray oil-rubbed bronze which would pop against the antique white.

DO or DIY | Tall Dresser Transformation

Finally, we decided to paint the top a flat black for a cute contrast (2 coats).  After the black dried, we painted three coats of polyurethane to seal it.

DO or DIY | Tall Dresser Transformation

It came out even better than I thought.  I knew I was going to have a hard time letting go of this one.  So what did Chris do?  List it for sale of course.  I decided to give it two days then secretly take the sales post down.  Can you guess what happened?  We were contacted by someone interested in buying it immediately.  Boo.

And then I did a bad thing…  I fibbed a little.  I told the potential buyer that it just sold.  I mean, it was sort-of true.  I just didn’t mention that I had sold it to myself…

Eep, Chris was going to kill me.  So I took the obvious next course of action.  I went on a desperate search for an identical dresser.

Apparently I had stocked up on some good furniture karma because I found this guy for sale.

DO or DIY | Tall Dresser Makeover

Now for a side by side.

DO or DIY | Tall Dresser Transformation  DO or DIY | Tall Dresser Makeover

Pretty close eh?  I got it for only $5 more – still solid wood and a name brand piece, just slightly shorter.  The buyer was interested so I just needed to break the news to Chris that we had 2 days to finish the piece and oops, we were keeping the other one.  Love you honey!

Transformation Breakdown:

  • Base Paint: Antique white
  • Top Paint: Flat black
  • Hardware: Oil-rubbed bronze

After.

The dresser I saved…

DO or DIY | Tall Dresser Transformation

DO or DIY | Tall Dresser Makeover

The detailing on the feet and shell applique may be my favorite part.  I love how they were really enhanced by the paint and distressing.  Before, they seemed to get lost, blending in with the rest of the piece due to it all being the same stain color.

DO or DIY | Tall Dresser Makeover

DO or DIY | Tall Dresser Makeover

And now for the substitute dresser…  Now if only I could always get away with this tactic…

DO or DIY | Tall Dresser Transformation

8 Comments

Filed under Furniture Flip

Four Trips Around the World

DO or DIY | Globe Makeover

Hers.

What’s black, white, and chic all over?  That would be my new globe!  Before I go much further, I need to issue a warning to my former geography teacher: if you happen to stumble upon this post, please skip it.  Some funny business may be about to happen to an old globe.  No globes were necessarily hurt in the process, just altered… slightly…

But let me start at the beginning.

Now that we’re slowing down on full-on room makeovers, I’ve been more focused on accessorizing.  Sometimes, I get overwhelmed by finding things that both fit our decor, fill the space needed, but also don’t just look like I raided all the shelves of Home Goods for a generic look.  Don’t get me wrong- I love me some Home Goods but it’s hard to find unique, one-of-a-kind pieces in a box store.  That’s why I’ve been trying to outfit our home with both the new and old to give it that truly lived-in, home-y feel.

To help fill the “old” criteria, I’ve been loving the non-traditional look of black and white globes lately.  It transforms a classic school room item into chic looking decor.

I especially loved the idea of a chalkboard globe, especially with chalkboard’s newfound popularity.

DO or DIY | Globe Makeover

Source: Pinterest

DO or DIY | Globe Makeover

Source: Domayne 

I found these two retail options- one from Z Gallerie (non-chalkboard) and the other from Anthropologie (made of soapstone for a chalk option).

DO or DIY | Globe Makeover

Source: Z Gallerie, $79.95

DO or DIY | Globe Makeover

Source: Anthropologie, $368 

Hmm… a little pricey for a non-functional globe who’s only purpose is making a corner of my room prettier (former geography teacher- are you still reading? Seriously, skip this post).

I figured this would be the perfect candidate for our next DIY.

I know some people have refinished globes and used them as a message board instead, but I actually like the look of all the continents on there so I decided to stay that route (see geography teach, I’m a half truest so not all is lost!).

I was pretty on-board with a chalkboard option… until our 3 year-old nephew was scheduled for a visit and we dashed around the house child-proofing as best we could.  In the midst of our impromptu safety check, I came to the realization that a chalkboard globe was doomed for being erased if ever in reach of anyone under the age of 13 (or with my luck, the cat would think it was her new friend and lick it clean) and the thought of redrawing all seven continents again sounded like a nightmare.  No thanks.  The more permanent, the better.

His.

I’m not much of a geography expert. In fact, unless they make a car or beer I like, I probably can’t find it on a map… which basically means I can only find Germany and Ireland. So when Julie announced she wanted a globe, I figured it would at least be a learning opportunity, so the search began.

Around the same time, my mom knew we were always on the lookout for cool antiques and was offering a few items she had picked up from my grandparents’ house, one of which was, rather conveniently, a globe. Apparently my great-grandfather was a teacher, and she had picked up the globe he had in his classroom. It was about at simple as you could get- it was round, resembled the planet earth, and had a stand that did little more than hold its axis on a tilt and allow it to spin… sort of- but it was all we were really looking for. I got my mom’s blessing to paint it, and now we had a project.

DO or DIY | Globe Makeover

First of all, since we were going to paint it, we needed a way to redraw the continents after we painted over them. Granted, this thing was so old it still listed Prussia and the USSR as countries, but the continents have only moved a negligible distance since the 50s and Julie only wanted to trace the continents, so it was good enough. I’m so bad at drawing that I can’t even trace, so that part was left to Julie. I just had to spray it.

Since we were going to paint the stand differently than the globe, I had to find a way to hold it up to paint it. My solution? Cut apart and bend up a coat hangar and hang it from a tree in the backyard:

DO or DIY | Globe Makeover

Pretty cool, huh? I wanted to do a scaled-down version of the solar system, but a) our entire neighborhood isn’t big enough and b) I have yet to find globes for the other seven planets. Bummer.

Anyway, once I got it strung up, I sprayed it with a coat of primer:

DO or DIY | Globe Makeover

Now that I turned the Earth into the Moon, it was time for a few coats of black paint. We went with a basic flat black and since we weren’t convinced this would work out in the first place, we just used the cheap stuff from Wal-Mart.

Julie wasn’t particularly fond of me using her curtain rod to dry my globe:

DO or DIY | Globe Makeover

Once it was dry, we just had to paint the continents back on! As I stated before, I can’t even trace, so that task fell to Julie as well.

Hers.

You know what’s more fun than tracing a full globe once?  Doing it twice.

Okay, so this was the more cumbersome point of the project but I just turned on Brother vs Brother on HGTV to distract me from the mundane task (anyone else watching that show and wishing they just filmed another series of Design Star instead?).

While you may already know they sell carbon transfer paper, did you know they sell white transfer paper?  This really saved the day on this project.  The regular carbon paper transfer would’ve gotten lost on the black paint so this did just the trick.

DO or DIY | Globe Makeover

I taped the tracing paper I had originally traced the continents onto on top of the white transfer paper then taped that to the globe.  Be sure you have it taped in a few places so it doesn’t slip while you’re tracing it.  I found it helpful to trace each continent on its own tracing paper sheet then trace them on the globe one by one.  I also left myself guides when I ran out of sheet (i.e. Turkey goes here, or match up Spain here, etc).

DO or DIY | Globe Makeover

Use a ball-point pen (color doesn’t matter) to trace the image.  Push hard on the pen so as you need to go through two layers- the tracing paper and the white transfer paper- but don’t push so hard that it tears the sheet.

DO or DIY | Globe Makeover

Getting up close and personal with the world even taught me a few things in the process:

  • I forgot how close Russia and Alaska were to each other.  I mean, I know Palin can supposedly see Russia from her house but, really, she probably can!
  • Greenland is massive.  I mean seriously, that country practically took up it’s own transfer sheet.

Here’s an example of what the transfer looks like on the globe after tracing it.

DO or DIY | Globe Makeover

Now to make it more permanent.  The best tool for tracing these thin continent lines was a white Sharpie paint pen.  I used the oil-based paint version with a fine point, found at art supply stores.

DO or DIY | Globe Makeover

Yay for tracing the world for a third time!  Seriously, time to enter me into a geography bee (hopefully they use a 1950s map).  Be sure to shake the paint pen and press the tip down a few times to test it before going to town on the globe.

DO or DIY | Globe Makeover

The paint was showing up a little thin on the first coat so I went over it a second time.  Yup, you counted right… I ended up drawing the world a total of four times.  Good thing a Brother vs Brother marathon was on… although, I’m seriously annoyed by that show.  For anyone else who watched it, was I the only one annoyed that the girl who worked her butt off despite having the flu didn’t even make it to the final two?  Also, how ridiculous was it that they wasted air time having the teams compete to see which house they would work on each week?  No one cares- just give them their assignment and let them start working.  Sorry, rant over.

With the fourth coat, we were done!  Finally!

For those of you wanting to recreate this project, here’s our list of materials:

  • Flat black spray paint (the cheap kind from Walmart will do): $1
  • Tracing paper (found at any art supply store): $3
  • White transfer paper (found at any art supply store): $3 (with 40% coupon at JoAnn’s)
  • White Sharpie pen, fine point (found at any art supply store): $3
  • Old globe: ours was free
  • Total cost: $10

Not too bad for $10 huh?  You can find cheap globes at flea markets and thrift stores so even if your awesome in-laws don’t have a spare one on-hand to let you experiment with, you can still do this project on the cheap.

After.

DO or DIY | Globe Makeover

DO or DIY | Globe Makeover

DO or DIY | Globe Makeover

19 Comments

Filed under Easy DIY Projects

Baby Makers

Hers.

Once upon a time, Chris sold my beloved bedroom dresser out from under me.  This is the tale of his betrayal.

His.

OK, I’ll be the first to admit it: Julie really does have an eye for design. She sees potential in things that most people would think is just junk (myself included) and I can honestly say she’s usually right. If only she had felt the same way about my classic Audi:

4000s

Anyway, I kind of started to think she was losing her touch when she said she had found a new candidate for our furniture projects:

DO or DIY | Dresser Makeover

I had learned to trust her assessment, but this was pushing it. Just looking at it was like warping back to 1981, but I decided to trust her anyway. So off we went.

When we arrived at the seller’s house, all I can really say it that it looked better in the pictures- and that’s saying a lot. This was just about the ugliest piece of furniture I’d ever seen in person, complete with freaky little lion’s head drawer pulls. I mean, what the…?

So once again I decided I should just trust Julie, and I forked over some cash. If nothing else, it was solid wood and was so heavy that the seller had to recruit her son to help me carry it, so I knew it was a quality piece… albeit ugly as sin. I should also mention that my truck was in the shop and I hadn’t measured the rental car they gave me, but it was just a rental, so we just started cramming it in there. If it fits, it ships, right?

Once we got it home, the real work began. We decided we would paint the body white but stain the top. I was feeling lazy and decided the stain job on the top was decent enough, so I just masked it off and started sanding everything else.

DO or DIY | Dresser Makeover

DO or DIY | Dresser Makeover

All those weird curves and corners really chewed up the sandpaper, plus there was enough furniture polish on the thing to make the surface frictional coefficient effectively zero.

Anyway, once we scraped off all the layers of polish, it was time for the primer. We typically use rattlecan primer because it’s easier to apply, but after this project I went out and bought a respirator mask because the fumes were making me sick.

DO or DIY | Dresser Makeover

I should also mention that we pulled all the hardware off and painted it “oil rubbed bronze.”

Finally, it was time to paint. We used to use rattlecans for everything which is decent enough for small jobs like nightstands or small tables, but we discovered that it’s really difficult to spray evenly across large surface areas. Eventually, we wised up and bought a paint sprayer on Craigslist- and it was the best $40 I ever spent. Now we just have Home Depot match a gallon of latex paint to whatever color we like and can spray multiple pieces to an exact match for a fraction of the cost, and without killing any brain cells.

Two coats later, I had a dresser:

DO or DIY | Dresser Makeover

DO or DIY | Dresser Makeover

DO or DIY | Dresser Makeover

DO or DIY | Dresser Makeover

DO or DIY | Dresser Makeover

Julie is also obsessed with drawer liner:

DO or DIY | Dresser Makeover

Depending on how often you creep on our pictures, you may or may not see that this is in our bedroom. Or was. While I’ll happily admit that the final product looked great, it still wasn’t something I was absolutely in love with. After debating it for a few months, Julie finally agreed to let it go for the right price. Low and behold, we eventually got a full price offer, and a young pregnant couple took it off our hands to use as a changing table, which was the first in a very long line of pregnant people we ended up selling furniture to, which was a really weird trend to end up in.

Oh, and Julie is still whining that I sold it.

Hers.

Traitor.

DO or DIY | Dresser Makeover


10 Comments

Filed under Furniture Flip