Category Archives: Dining Room

Chalk It Up to Johnny

DO or DIY | Easy Chalkboard Transfer Art Tutorial

Hers.

Confession time.  I suffer from a pretty severe fear of unnecessary nail holes, meaning I have a total inability in deciding what and where to hang things on the wall, which ultimately leads to some pretty bare walls in our house.  I’ve mostly hidden it from you all, thus far, but it’s time to come clean and fess up with picture proof.

Sigh.  Our dining room.  It is, by far, the worst offender.  I hung the beautiful painting Chris’ grandfather painted on one of the small walls by the window but, four years later, had still not made a decision on what to put on the largest wall above the buffet.  Now, for the big reveal… the corner of the dining room I’ve been avoiding to show you…

DO or DIY | Easy Chalkboard Transfer Art Tutorial

The walls haven’t remained empty all these years due to a lack of ideas.  About twice a month a light bulb would go off and I’d excitedely tell Chris all about my grand plans for that wall.  He’d nod and agree, I’m sure figuring I’d never commit and he was safe from any real work.

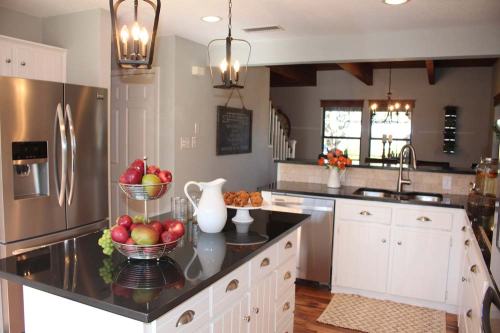
The real push finally came in the middle of my weekly “Fixer Upper” fix.  Anyone else obsessed with that show on HGTV?  It almost makes me want to move to Waco… until I remember suburbia already feels like the boonies to me.  In one of the more recent episodes, they framed a chalkboard for wall art in the dining room (see below).  Feel free to drool over those lanterns above the island with me as well.

DO or DIY | Easy Chalkboard Transfer Art Tutorial

Here’s a closer shot- ignore the creepy shot of the people.  While I’m confessing, I may as well share that this is a picture I took of my TV while this episode was airing so I would remember the idea.  I’d like to say this is the first time but it happens quite a bit… #nojudgments

DO or DIY | Easy Chalkboard Transfer Art Tutorial

Now while the idea of using a chalkboard for art isn’t novel by any means, there was something about the frame they used that got me thinking.  We had one pretty similar that we had scored for free a few months back.  I had used the mirror for something else and the frame had been laying around ever since.  I knew I had to find a use for it soon or else it would meet the fate of one of Chris’ garage purges.

The first decision I needed to make was whether or not I wanted this to be permanent.  While I love the idea of a chalkboard in theory, I have a few problems with it in reality.

1) I hate the sound and feeling of writing with chalk on a chalkboard.  Just thinking about it makes me shiver.  Yech.

2) I know way too many kids under the age of 10 (including two brothers with a sense of humor of about an 8 year old) to know that one look at a chalkboard and the art will be a distant memory.

3) I know myself enough to realize that I’ll spend a ton of time laying out what I want to say and how to write it that I’ll never want to erase it and start over.

So, the decision ended up being pretty easy- I was going to make a faux chalkboard with permanent art.

Next came the hardest part- figuring out what to write on it.  I filled up a whole Pinterest board of ideas and drove Chris crazy with showing him dozens of options on a daily basis.  Should I go with a food pun being that it’s in a dining room or maybe a cliche inspirational quote about homes, hearts, etc.?  I ended up deciding on song lyrics, something meaningful to us and something that could work in case I ever decided to move this into a different room.

And what screams “let’s dine in the fancy room” more than the man in black?  Well, maybe not, but one of Johnny Cash’s songs is pretty sentimental to us so the decision was made and away we went.

Now, get ready to have your mind blown.  This is seriously way easier than I ever expected it to be and I’m going to use this transferring trick all the time.  Once I finally figured out what I was doing and laid out the art, this took no time at all to complete.  Here are the six easy steps to transferring a printed image and pulling off a chalkboard look.

Materials Needed:

  • Plywood
  • Flat black paint (or chalk paint for erasable option)
  • Fine tipped white paint pen (or chalk for erasable option)
  • Chalk
  • Ballpoint pen
  • Printed piece of artwork
  • Tape

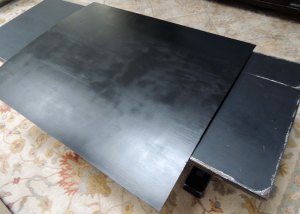
Step One: Cut a piece of plywood down to the size desired and paint with flat black paint.  Again, I wanted something permanent but you could also do this with chalkboard paint if you wanted something erasable.  I ended up painting two coats for an even look.  I left it overnight to dry completely.  Pre-paint tip: sand the plywood thoroughly for a smooth surface- I used two different grit sandpapers to achieve the smoothest finish.

DO or DIY | Easy Chalkboard Transfer Art Tutorial

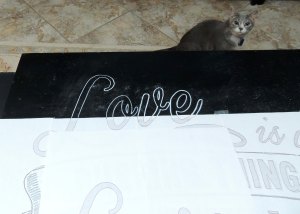
Step Two: print out your artwork.  You can print it on any printer- black/white, color, laser, inkjet, anything.  I wanted a pretty big piece so I had to print my artwork in a panel fashion then tape together.  If you want to be really fancy, you can print it on one oversized piece of paper at a copy shop but paneling and piecing together works just fine- you’re not keeping the paper anyway.
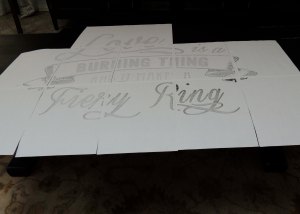
DO or DIY | Easy Chalkboard Transfer Art Tutorial

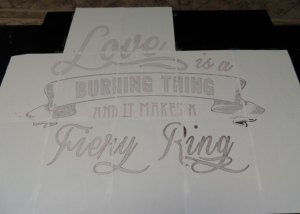
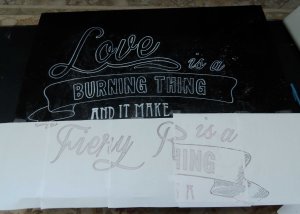
Step Three: With the side of a piece of chalk, rub the back of each piece of paper and retape it to the board in the final pattern desired.
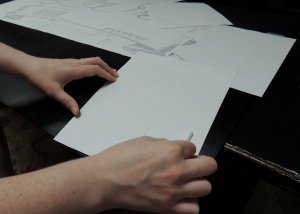
DO or DIY | Easy Chalkboard Transfer Art Tutorial

Step Four: With a ballpoint pen, trace the lines of the artwork.  Press pretty hard so the image transfers clearly.  I used a red pen so I could see where I had traced.
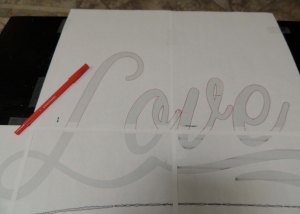
DO or DIY | Easy Chalkboard Transfer Art Tutorial

DO or DIY | Easy Chalkboard Transfer Art Tutorial

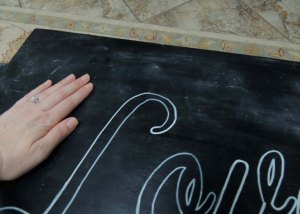
Step Five: After tracing the full piece, remove the paper.  You’ll see faint white lines on the board that will serve as a guide for this step.  Using a fine tipped white paint pen (or piece of chalk if you want to keep it erasable), trace over those transfered lines for a clear image.  Tip: I removed the papers one by one and did this in stages so I didn’t accidentally smudge the lines with my palm as I traced.

DO or DIY | Easy Chalkboard Transfer Art Tutorial

DO or DIY | Easy Chalkboard Transfer Art Tutorial

Step Six: You’re almost there!  To make it really look like an authentic chalk board, rub the side of a piece of chalk across the board and smooth with your hand for the chalked background effect.

DO or DIY | Easy Chalkboard Transfer Art Tutorial

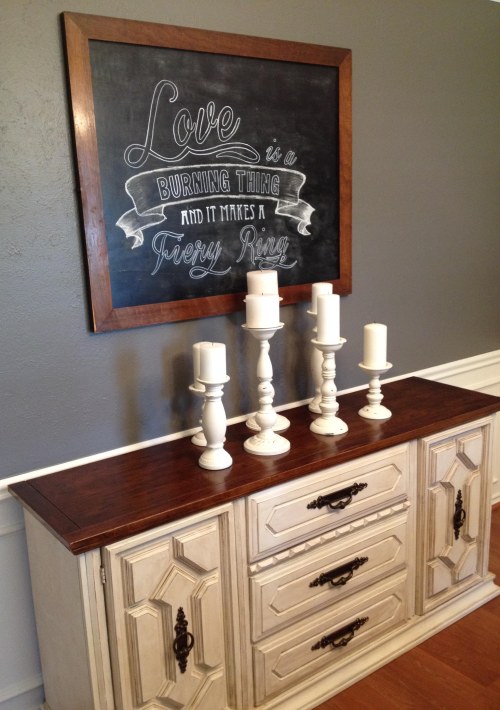
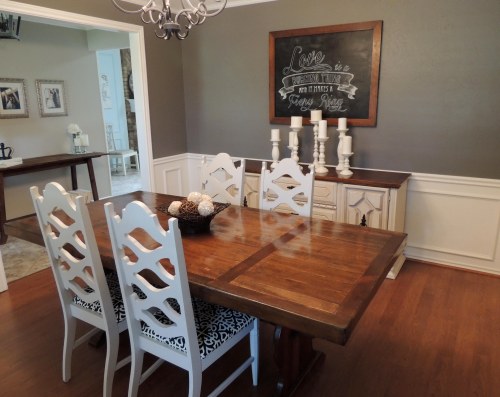
Boom.  Chalkboard art!  I really don’t know why I waited so long to do this.  This was seriously one of our easier (and quickest) projects!  It makes me want to do it again… and again… Hey, Chris, what do you think about a full wall of chalkboard art?  Muhaha.

His.

Confession time. I hate country music. Actually, that’s not much of a confession. Anyone who knows me knows that, as Joe Dirt would say, “I’m a rocker, dude, through and through!”  It all sounds like twangy complaining intertwined with shout-outs to step mommas, guns, and trucks, and I find it really irritating- the exception, of course, is Johnny Cash. While I’d consider his style more in line with rockabilly, he is widely regarded as the godfather of country music, and he’s one of everyone’s favorite artists. In fact, I don’t know anyone who doesn’t like at least one Cash song, and frankly, I wouldn’t trust anyone who didn’t.

The song he is most renowned for is, by far, Ring of Fire. While there is some controversy surrounding when, why, and by whom the song was originally written, there is no question that it’s proven to be one of the greatest and most unique love songs ever written. And it’s awesome. So when Julie came to me with the idea that it be immortalized in our dining room, I was totally on board.

Now, here’s the problem: she wanted to do a chalkboard. Last time we did a chalkboard we ended up going for a ride on the failboat, so I was hesitant to give in. After some debate, though, we decided that since we wanted the piece to be permanent and only look like a chalkboard, we could get away with using regular paint. The best part of this project, though, is that Julie had saved an old frame from some other project that had gone awry (why, I’ll never know) and we were finally going to get it out of the garage (it had only gotten in my way EVERY time I tried to do ANYTHING in there)!

Now, making a fake chalkboard is actually pretty easy. The frame originally housed a mirror and had a piece of plywood over the back, so I just pried off that piece and cut it down to size to fit inside the frame. Next, I primed one side and painted it black. We had some weird amalgamation of various sheens of black paint that we decided to use, and we BARELY had enough for two coats… but since the whole thing was getting smeared with chalk anyway, we figured any thin spots would be covered up.

The final order of business, once the art was actually transferred onto the wood, was mounting the wood in the frame. Since the wood was actually a different thickness than the mirror had been, we weren’t able to reuse the same mounting tabs. So, being the lazy fellow that I am, I just ran some short screws into the backside of the frame overlap:
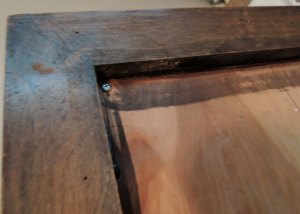
DO or DIY | Easy Chalkboard Transfer Art Tutorial

Boom. Fake chalkboard.

After.

DO or DIY | Easy Chalkboard Transfer Art Tutorial


DO or DIY | Easy Chalkboard Transfer Art Tutorial


DO or DIY | Easy Chalkboard Transfer Art Tutorial

Hers.

I’d like to say I’m on the path to “empty wall syndrome” recovery but I have quite a few walls left to go.  At least one room has finally been conquered.  And here’s a fun picture I dug up.  Here’s where the room started when we first bought the place (the furniture in the picture was the seller’s before we moved in).  And for those of you who haven’t heard the story of that fabulous leopard print/black fringe chandelier, catch up here.

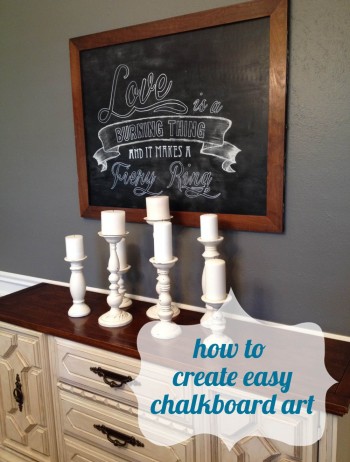
DO or DIY | Easy Chalkboard Transfer Art Tutorial

3 Comments

Filed under Dining Room, Easy DIY Projects

In the Dining Room, With the Candlestick

Hers.

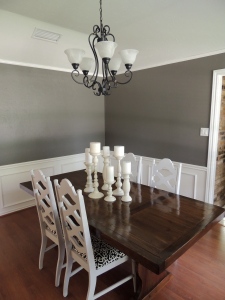
Eighteen months after living in the house, we finally got around to buying a dining room table (another CraigsList find, by the way).  We felt accomplished having finally filled the room with something besides the constantly growing tumbleweed of cat fur (seriously, how does something so small generate so much fur?!).  Well, then the table sat empty, void of any decor, for another four months.  Then came the saddest looking three, black candlesticks you’ve ever seen.  Leaving the table empty was probably a better looking option, honestly.  I decided what the three candles needed were more friends and possibly a little spray paint to add some interest to their dull, black look.

Knowing I was going to spray everything anyway, I began the hunt for interesting shaped candlesticks, not caring what the color was.  So, of course that led to picking out some of the ugliest candlesticks known to mankind.

Well, maybe second to these… honey, you’re going to regret this decision someday.

Aaaand now for the runner-up…

Look at those things.  They look like they belong in some tacky, safari party.

Quick, get me my spray paint.  Of course we used our go-to color, Rust-o-leum Heirloom White.

First coat (and I actually helped this time… before you argue, Chris, I’m not yet claiming to have sprayed it 100%).

Ah, much better.

Then we flipped them over to do the second coat.

So, we may have skipped the priming step, which turned out to be a mistake.  The spray paint had a hard time sticking to some of the glossier candlesticks and ended up dripping a little.  Not a huge deal.  We just sanded out the drips with a sanding block and went on with the next round of coats.

We finished with one final third coat and voilah, no more weird-tribal candlesticks.

I decided the candlesticks looked too plain and “new” and by now, I’m sure you’ve figured out the new, fresh out of the box look doesn’t really match the rest of our decor.  These babies needed a little distressing!  You know I always love a good reason to bust out my sander.  After a few minutes of distressing all the edges and detailed trim, the project was complete.

Now…. if we could just fill up those empty walls…

His.

This may surprise some of you, but most of the projects we do together aren’t by choice. Usually, Julie announces she doesn’t need my help, which is really just a tact to get me to let her buy something we don’t need. “Don’t worry, I can do this myself!” she always says. The majority of the time, though, she gets part of the way into something and then comes running to me because it’s “not working” or something to that effect. This is one of those times.

We bought our dining room table in the fall, so it was initially decorated with some really cool Halloween stuff, which I wanted to leave out all year (Julie never lets me get my way). Eventually, we had to find a permanent solution. Julie found some candlesticks from… wherever… and I assumed we now had table decorations. I was wrong.

This table is something we have literally used twice, so I can say with confidence that it’s something I had little (read: no) interest in. Be that as it may, I was ultimately dragged to Garden Ridge in search of more candlesticks. Shopping with Julie is something that can really only be described as an undertaking, but I eventually got her out of the store with most of my savings intact. Once we got home, though, I realized the real fun was about to begin as Julie said the six words I fear most: “We need to spray paint these.”

Within five minutes of setting up, something went wrong and Julie came running for help. It turns out that the paint cans were putting out a dark, uneven, and textured spray pattern. I cleaned the nozzle and shook the cans a little longer and all seemed well until, of course, the paint started running. For something so small, these candlesticks were really getting on my nerves. Finally, over the course of several days and several coats, we managed to get an even coat to stick… which, of course, Julie then wanted to sand off (“distressing”, she calls it).

I’m just ready for Halloween again.

After.

P.S. Did you spot our little ball of fur?  Hint: it’s not Colonel Mustard.

6 Comments

Filed under Dining Room, Easy DIY Projects

The Great Leopard Extinction

Hers.

Could anything top a leopard print chandelier?  Sadly, yes.

At first glance, the dining room chandelier that came with the house looked like it had leopard print mini shades with black fringe on the edges.

Chris and I were quick to agree that this would be one of the first things we changed in the house (after the wood paneling of course, more here if you haven’t read up on that adventure yet).

As we began disassembling the chandelier, we discovered the chandelier held a deep, dark secret…

…it was not leopard print.  Oh no, it was much worse.  It was a tan and black leaf pattern made to look like leopard print from afar.  See for yourself.


We couldn’t decide what was worse- that someone decided to approve this design for manufacture or that someone saw it a store and liked it enough to spend money and take it home with them.

Jokingly, Chris and I decided to list the chandelier on eBay providing full disclosure of the… unique… chandelier.  Leaf print and all.  We figured it would go unsold, or someone would snatch it up for the minimum price of $0.99.  Much to our surprise, after a week, bidding shot up to $70.  Seriously??  But we weren’t going to question it.  Hey, it paid for half of the price of our new chandelier.  Cha-ching!

Speaking of new chandelier, after scouring a few home improvement and lighting stores, we finally decided on a wrought-iron five-light chandelier from Home Depot for $140 (the brand is Hampton Bay, if you’re curious).  It was just the right size for our quaint dining room and provided an instant updated look.  I couldn’t find the exact model at Home Depot but here are a few similar options available: here and here.

Although Chris had a few installation issues, installing lighting is usually pretty easy and provides such a quick update or style shift to a room.  I’m obsessed with our new chandelier and it helped shape the remainder of our room.  Is it weird to style a room based on lighting?  Maybe.  But, hey, it works.

His.

“What is… that?”

That was my first question upon entering our house the first time we looked at it with the realtor. From a distance, it looked like it was constructed from brass coat hangers and topped with some sort of leopard print and black fringe shade. I immediately thought of the leg lamp from A Christmas Story, and I knew it had to go.

It was clearly going to be my first electrical project.

In physics class, I struggled with electricity- it’s very complicated, very abstract, and very boring. In practice, I excel in electricity- it’s very straightforward, very dangerous (my kind of fun!), and when you get it right, it’s very rewarding. So in general, I enjoy electrical work. What I don’t enjoy, however, is hanging things from a ceiling. As Julie was about to find out, there is a huge difference.

Julie picked out a really cool chandelier. It has clean, flowing lines and a subtle wrought iron look but also retains the “classic” chandelier image. It’s also heavy. Like, really heavy. If you’re ever mounted an electrical component to a ceiling, you know that at some point, it requires wiring everything up with one hand while supporting whatever you’re installing with the other. This isn’t a huge deal when it’s a 10-ounce dome light, but a 10-pound chandelier is another story. Somehow, that 10 pounds increases exponentially every minute, meaning you have about a minute to wire everything up before your arm gives out and your new chandelier has a fight with gravity.

After a few tries, I gave up. The wires just weren’t cooperating, and my arms were getting sore. Julie threw a fit because her family was coming to visit that weekend, and what would they think if we didn’t even have a light in the dining room (which was embarrassingly empty, anyway). As Julie whined about how little she understands about lamp installation (that’s what it sounded like to me, anyway), the solution hit me- brothers-in-law! I keep forgetting that Julie’s brothers aren’t in the third grade anymore, so I told them I’d let them watch all the sports they wanted if they agreed to hold the chandelier while I wired it up. Jackpot! Within minutes I had a well-lit dining room and a TV that was stuck on ESPN for two days.

I’ve learned a few things in my years as a DIYer, and the most important is that no one works for free. So whether it’s a case of Guinness or all the SportsCenter they can handle, everyone has a price. And I’m not above bartering.

Here’s the final product (and, yes, we did paint the walls as well but more on that later):

8 Comments

Filed under Before & After, Dining Room

Tales of a CraigsList Addict

Hers.

I’ve been on a mad hunt for the last few months for the perfect dining room chairs.  I was torn between buying something ready-to-go from a home furnishing store and finding a used hidden treasure.  I found a few chair candidates at various stores but there were two main problems- 1) each chair was over $100 each and 2) I really wanted to customize the chairs with a fun print but there just weren’t any stores that provided this option in a cost-effective manner.  So thus began my weeks-long search on CraigsList, scouring for the perfect chair.

I sifted through hundreds of listings, many at 2 am to Chris’ dismay.  I had a very specific chair in mind- wooden back, interesting design (no plain ole ladder backs for me), and a really awful fabric seat that was dying to be recovered.  It turned out to be quite the challenge to find 4 matching chairs that fit these criteria.  But, one late night after quite a few elbow nudges from Chris (indicating I should give up), I finally found them.  The design was just what I was looking for.  The wood was an outdated stain, which helped ease my worry about painting over the wood.  And the fabric seats were as awful as I had dreamed (it makes the “before” pictures that much better).  I excitedly shook Chris awake to tell him of my big accomplishment.  After only receiving a muttered response and not much else, I decided that was my go ahead.  The next afternoon, Chris and I were on our way to buy the chairs.

I was a little nervous about the purchase because I could tell Chris thought these chairs were the definition of hideous.  I reassured him (and myself) over and over again that they had potential.  He just had to wait and he’d see.

I found an awesome geometric print from Joann’s Fabric that would instantly modernize the chairs and settled on a light gray color for painting the chair, which complements our dark gray dining room.

We spent our Saturday painting the chairs, to which I learned never paint against the grain of the wood if you want a clean look (oops, live and learn I guess).  While the chairs dried, we took to recovering the seats.  Chris perfected folding corners and I worked on conquering my fear of staple guns (a fear that stemmed from Final Destination 3… not a joke).

Less than a day later (much of which was thanks to the extreme Dallas summer heat which sped up the paint drying process), we were done!  They turned out great and are my new home obsession.  I’m officially addicted to finding chairs on CraigsList to refurbish, whether Chris likes it or not.

His.

I’m really happy with these chairs for two reasons: 1) we finally have something in the dining room, and 2) I don’t have to listen to Julie complain about needing something in the dining room.

I also get to sleep at night. I kid you not, I was waking up in the middle of the night to find Julie wide awake next to me, scouring the internet for… chairs. I’m no doctor, but I’m pretty sure that’s not normal on any level. Oh, and then she’d complain about being tired all the time… nooooo, really?

So last week I got a call at work from Julie that went something like this:

Julie: “Don’t forget, we’re going to look at those chairs tonight.”

Me: “Wait… what chairs?”

Julie: “I told you. The chairs I found on CraigsList!”

Me: “You never told me about any chairs on Craigslist.”

Julie: “Yes I did! Remember? Last night… When you were asleep.”

As if my opinion mattered, we went over to look at some chairs. I could see that Julie loved them and saw potential, but for some reason all I could think of when I looked at those chairs was the Bundy house. So after biting my tongue and forking over my emergency gas money, we were on our way home with a new project, as if we really needed another one.

First and foremost, we had to paint them because they were hideous. Julie picked out a light gray color, we sanded  the sheen off, and we started painting. It was about 105* out, so by the time you finished your second brush stroke, your first one was dry. This meant that any drips or uneven spots were almost impossible to fix in time, so getting things to look good was quite the task. I realized the next day that Julie didn’t know you had to paint with the grain… I swear, sometimes I want to sign her up for Cub Scouts.

Not only were they in desperate need of a paint job, but even I can admit that they needed to be recovered. If it matches your grandparents sunroom furniture, it’s probably not a bad idea to invest in a little fabric. Julie has an irrational fear of staple guns, so the recovering was left to me… or so I thought, as Julie quickly discovered the satisfying “CLANK” that comes with stapling. At this point my job was to fold the fabric over the corners while Julie yelled “hurry, I want to staple!” Disconcerting, to say the least.

This whole experience taught me that I should hide my extra cash from my wife and save up for a paint sprayer. Fortunately, though, I had the foresight to install a dimmer in the dining room, so with the proper lighting these chairs really look great. And for the first time since we moved in, we finished a project in one sitting without going to Home Depot.

Details.

Fabric: Joann Fabric, on sale for $12.00/yard, 2 yards needed

Chairs: CraigsList find, $125 for all four chairs

Paint: Home Depot, Behr, Burnished Clay, $14 for a quart

Total Project Cost: $163 which about equals one chair from Crate and Barrel or Pottery Barn.  Beat that!

2 Comments

Filed under Before & After, Dining Room