Category Archives: Kitchen

Trash Talk

DO or DIY | How to Make a Pull-Out Trash Cabinet

Hers.

It’s time to get trashy in the kitchen, people.  No, not as in “let’s decoupage the cabinets with faces of kittens.”  I’m talking about the age old kitchen question of where to stash the trash.

On day 1 of move-in, we put a trash can on the end of the kitchen counter by the breakfast nook and there it stayed for the next three years.  Not that we loved it being the first thing anyone saw when entering the kitchen, but we just had no idea where else to put it.

DO or DIY | How to Make a Pull-Out Trash Cabinet

For a small family unit of 2, we go through a lot of trash, even after sorting recycling.  There was the option of downgrading to a smaller can to put under the sink or in the pantry but I knew we’d never have a successful marriage because I’d be saying, “Chris, can you take out the trash” more often than “Honey, can you take care of dinner tonight?”… (which is already pretty common).

I found the perfect solution while perusing Pinterest the other day.  Why yes- let’s just build a pull-out trash cabinet!  I could find a medium-sized trash can and just tuck it away behind a cabinet door when I didn’t need it.  Genius!

pull out trash cabinet

Source: Schrock 

pull out trash cabinet

Source: Houzz

I even knew exactly which cabinet I could sacrifice for this purpose too.

DO or DIY | How to Make a Pull-Out Trash Cabinet

This cabinet never had an interior shelf and was an odd size for normal kitchen storage but would be the perfect space for a hidden trash can!

DO or DIY | How to Make a Pull-Out Trash Cabinet

I knew it was meant to be because we even had a pair of drawer slides leftover from our pantry project (catch up on the pantry project here).

We purchased the drawer slides for $5.99 each here (they’ve worked perfectly on the pantry since we installed them nearly 2 years ago, by the way.  We highly recommend them as a super cost effective solution for pull-out shelving!).

With the solution in mind, I turned it over to the execution department (hm, maybe another term is in order so it doesn’t sound like I turn our projects over for beheading).

His.

Growing up, there was a constant battle between my parents about where to put the trash can: my dad wanted it in a convenient area in or around the kitchen, but my mom wanted it completely out of the house. Their compromise was to keep it in the laundry room, which was technically halfway between the kitchen and the back door. Somehow, though, the battle ensued once again after I moved out, and the trash is always in a different location every time I visit.

Fortunately, though, Julie and I never had such a conflict; we both tend to be a bit lazy, so keeping the trash anywhere outside of the kitchen was definitely not an option. There also wasn’t really anywhere in the kitchen to keep the trash can, so… out in the open it stayed. We did, however, put another trash can in the garage so that we could dispose of the “funkier” items so as not to stink up the house. This system worked quite well for about three years until one Saturday afternoon, the inevitable happened: Julie changed her mind, and now she wanted somewhere to hide the trash. Lucky me.

It turns out, though, that luck was actually on my side for this one, as Julie had already decided where she wanted it and I already had everything I’d need, which was really just some wood and some sliders, all of which I had leftover from previous projects.

The first step was to get the sliders mounted inside the cabinet. I cut some strips out of plywood (I needed thin wood) and screwed it to the inside walls.

DO or DIY | How to Make a Pull-Out Trash Cabinet

Next, I mounted the sliders to the wood, making sure the two sides were level and even with each other:

DO or DIY | How to Make a Pull-Out Trash Cabinet

Next, I cut down some 1/2 x 4 wood pieces and mounted the inner slide piece to them:

DO or DIY | How to Make a Pull-Out Trash Cabinet

DO or DIY | How to Make a Pull-Out Trash Cabinet

Initially I tried spacing everything out and making a box so I’d have a cross piece to mount to, but it turned out to be a huge pain to get the widths right, so I gave up and removed the front and back piece, and just mounted the cabinet door directly onto the sliding wood pieces.

DO or DIY | How to Make a Pull-Out Trash Cabinet

Once everything was done, we had an issue of the door slowly sliding open when it began to become weighed down with trash, so I needed some sort of latch that was easy to open but also stayed out of sight. My solution was a magnetic catch, which was just a metal tab mounted to the door that would stick to a magnet mounted inside the cabinet:

DO or DIY | How to Make a Pull-Out Trash Cabinet

DO or DIY | How to Make a Pull-Out Trash Cabinet

Next, I reused the original cabinet pull and just lined it up with the drawer pull above it:

DO or DIY | How to Make a Pull-Out Trash Cabinet

Then I had to patch and paint the holes from the old pull location and nail gun:

DO or DIY | How to Make a Pull-Out Trash Cabinet

DO or DIY | How to Make a Pull-Out Trash Cabinet

Boom. Trash cabinet.

Materials Needed:

  • Drawer slides, $5.99 from eBay
  • 1/4″ Plywood – 2 strips, already had on-hand
  • 1/2″ x 4″ Lumber – 2 pieces, already had on-hand
  •  Magnetic catch, $1.28 from Home Depot

Price: Since we already had the wood leftover from previous projects, this came out to a grand total of $7.27.  Not too bad for some trash.

After.

DO or DIY | How to Make a Pull-Out Trash Cabinet DO or DIY | How to Make a Pull-Out Trash Cabinet

Now you see it.

DO or DIY | How to Make a Pull-Out Trash Cabinet

Now you don’t!

DO or DIY | How to Make a Pull-Out Trash Cabinet

4 Comments

Filed under Easy DIY Projects, Kitchen

We Have An Arch Nemesis

Hers.

And it’s name is: our pantry door.  Chris and I are coming to find that we have bad door luck.  I don’t know what kind of bad door karma we picked up over the years… perhaps from my younger self slamming too many of them in teenage angst or Chris graffiti-ing his college dorm door with Irish drinking phases (he argues that his dorm was getting demolished after that semester anyway so why not pay tribute to our home land of paleness and potatoes).  Whatever it was, the door species has an enemy number one and it is us.

If you remember, our epic battle with doors began with our patio door.  After a year of living with a chewed up door from the previous owner’s dog, we finally bought a new door to replace it.  Turns out, the door didn’t fit.  A father-in-law, many colorful exclamations, and a full weekend later, the matter was finally resolved.  Read more in our post about it here.

Well, the evil door realm went dormant for a few years but, alas, it returned… with a vengeance.

But, let me start at the beginning.

You may remember our pantry renovation where we turned this disorganized, non-functional mess…

img_1857

Into this super functional, beautiful being (read more on the transformation here).

after8

We decided to replace the old pantry door with a new one that matched the rest of the new doors we’ve been installing throughout the house.

All done, right?  Wrong.  So very very wrong.

His.

I. (expletive deleted). Hate. Doors. I mean, I really hate them. We live in North Texas, a region notorious for unstable soil. What this means for us is, no matter how much care I put into expertly fitting our doors to within exact tolerances, the foundation will eventually shift one way or another and the door either won’t close or won’t stay closed. The pantry door, however,was another story. It had it out for me.

Julie was convinced we needed a door that matched all the other interior doors we were installing in the house. The pantry opening was 20″ and the smallest door I could find (without custom ordering something for like a million dollars or whatever) was 24.” “No worries,” I foolishly thought, “I’ll just cut 2″ off each side.” I was in for a bit of a surprise.

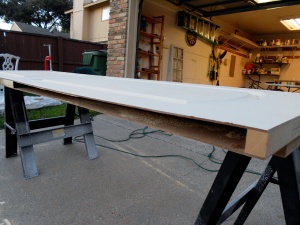
As I began cutting into the door I learned something very disheartening: doors are now such low-quality crap that they’re hollow. As in, there’s nothing between the side you open and the side you close. It’s just air. Now, I’m all about cutting costs, building efficiently, and conserving materials, but when my door is barely as sturdy as the box it came in, it tends toward the ridiculous. I’m kind of scared to knock.

Look at this junk:

DO or DIY | Pantry Door Transformation

So what did I do? Well,I had three options: order a custom door (I’d have to take out a second mortgage), buy a second door and try to figure something else out (I already wasted money on this one, why would I buy another useless cardboard box?), or do what I do best and pinch my pennies until a solution falls out. So, I took the one solid piece of the door (i.e. the outer frame, which is probably only there so you can mount hinges) and hammered it back in to make my own custom-sized door.

DO or DIY | Pantry Door Transformation

DO or DIY | Pantry Door Transformation

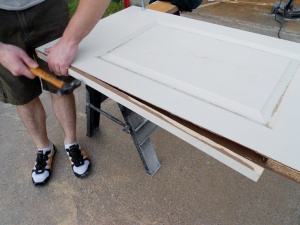
After a little glue, wood filler, and frustration, I had my own custom door. Is this the most ghetto thing I’ve ever done? Yes. Did it work? Mostly. It was still a tight squeeze so I had to sand it down in a few places.

DO or DIY | Pantry Door Transformation

Once I got it mounted and installed the knob, I had a door that was about 80% functional and, most importantly, looked good closed. For now.

DO or DIY | Pantry Door Transformation

As it turns out, the thin frame I reinstalled wasn’t quite up to the job of being, what I now realize, the most frequently operated door in the house, not to mention the fact it had a spice rack bolted to the back. Eventually the screws for the hinge managed to work themselves loose and a few had even ripped themselves out. So, effectively, the door fell off. Oops.

Hers.

Well, that didn’t go exactly as planned.  It wasn’t all lost though.  I took this as an opportunity to sneak in more “shabbiness” to our home (shh don’t tell Chris- he thinks shabby translates to junk, ha).  Besides, I had been dreaming of an old rustic-looking pantry door anyway.  None of that standard builder grade stuff here!

Come join me in my drool-fest over these fantasticly shabby doors:

DO or DIY | Pantry Door Transformation

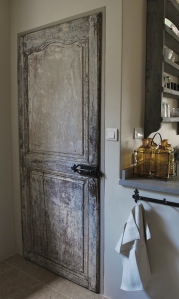
Source: Houzz via Pinterest
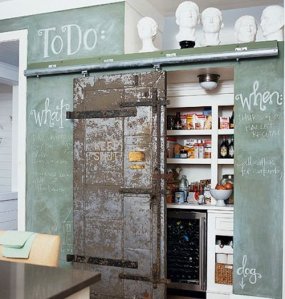
DO or DIY | Pantry Door Transformation

Source: Two Maisons

DO or DIY | Pantry Door Transformation

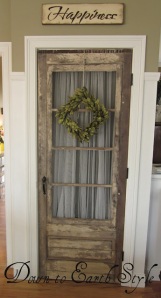
Source: Down to Earth Style

DO or DIY | Pantry Door Transformation

Source: Cottage Living

So, here’s the part where I tell you I found the perfect shabby contender for our pantry door, right?  Right.  Here you go.  Just look at her.

DO or DIY | Pantry Door Transformation

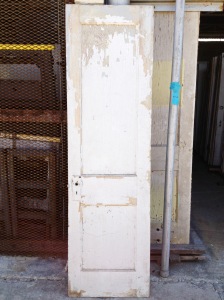
She was p-e-r-f-e-c-t.  And the best part?  I found her at a local architectural salvage place so, of course, she cost next to nothing for me to claim her.  Like $1o nothing.  Done and done.  Right?

Wrong.

Sooomeone (*ahem Chris) had to rain on my parade with the ole “I bet it’s lead paint” line.  Sigh, how I hate when the hubby proves me wrong.  Lead paint… pantry…. food… it doesn’t make for the best combo.  And now we mourn.  Goodbye old, poison-infused door.  

Sooo we were nowhere closer to keeping Chloe the cat out of turning our pantry into her personal jungle gym aka finding a pantry door.

To cheer me up, Chris drove us over to a second architectural salvage shop.  I kid you not, I sorted through the door section (which is made up of 400 or so doors) a full three times before I finally gave up and admitted they didn’t have anything that would fit the bill.  Not only that, but this place was significantly more expensive, like $60-100 per door more expensive.  I may be a little naive but isn’t paying $100 for an old beat-up door a little ridiculous, even for me?

As I made my way to the exit (moping and dragging my feet in disappointment of course), I saw an excited Chris galloping towards me.  I figured he found some old tools or, worse, the expensive set of gas logs he’s tried to talk me into for the last seven visits (what’s wrong with good ole firewood??).  But, instead, he claims to have found the perfect door… in the shutter room.  Whaa?

We rounded the corner to find piles upon piles of old house shutters stacked against each other.  It’s like the TJ Maxx of shutters in there.  Ugh, and I hate sorting.

DO or DIY | Pantry Door Transformation

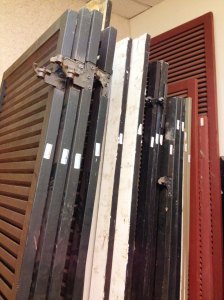
I decided to forfeit one clean finger to gingerly push each shutter from the other, one by one until I finally found the perfect candidate.

BOOM.

DO or DIY | Pantry Door Transformation

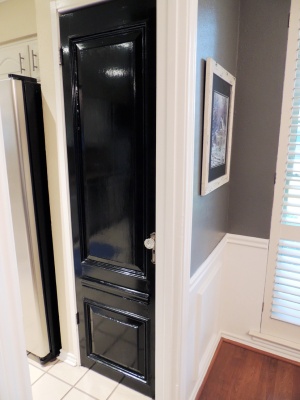
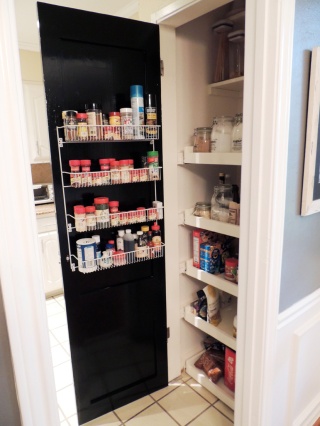
Helloooo new door.  What was most funny about this find was that finding a door for our oddly shaped pantry opening (20″ wide) had been a nightmare.  Door manufacturers apparently didn’t go that skinny.  This shutter was the perfect width!  All we had to do was trim it down a little on the bottom, which was solid wood so we wouldn’t have the problem we had with the last door which was hollow.  Also, it had all that intricate molding that made those old shabby doors look dull in comparison.  I was even sold on the black paint.  Glossy black doors ARE all the rage now, afterall.  Why not jump on that bandwagon already?

It was originally listed for $60 but, because it was a lone soldier- all the other matching shutters were either gone or didn’t make it to the store, the store discounted it down to $30 for us.  Why, yes, we will pay an additional $20 for a few extra years on our life aka a lead paint-free door.

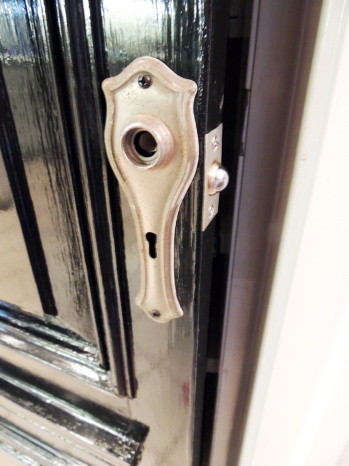
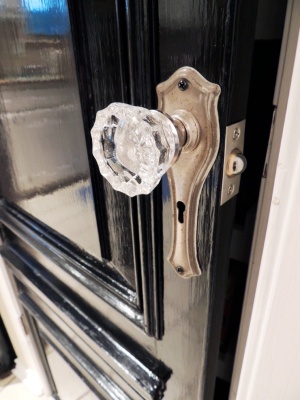
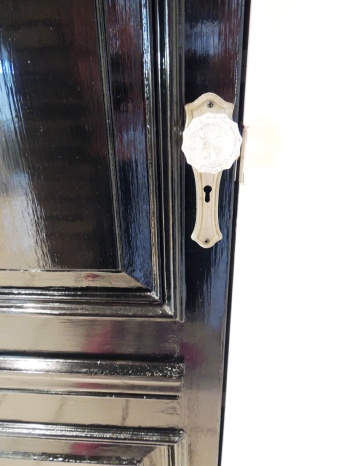
At this point, I was on a roll.  As we walked up to the counter to pay, we passed by the door accessories room (this salvage shop is so magical).  The heavens parted and there was my antique door plate and antique crystal knob that would complete the look of our pantry door.  Mama needs some bling, mk?

DO or DIY | Pantry Door Transformation

DO or DIY | Pantry Door Transformation

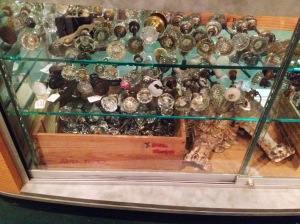
A $5 door plate, $7 knob, and $30 door later, we were all set.  There was no stopping us now!

His.

Alright, so we had to scrap the original door idea and were back to square one. By now Julie had decided that she really wanted an antique door, and since door dimensions weren’t really standardized until later in the 20th century, I figured that might not be a bad route to take. If nothing else, older doors are probably solid wood and can be cut to size without any, um, issues. So it was off to the “architectural salvage warehouse,” i.e. overpriced junkyard.

Our first stop was in a part of town that’s… well, it was in the hood. Like, I was surprised no one pulled smash n’ grab for my car radio. Anyway, they had just about every door ever installed in Dallas before 1950, so there was plenty to choose from. One common factor, though, was that they all had the tell-tale signs of lead paint. I don’t possess the equipment, facilities, or expertise to properly remove and dispose of lead paint, and since my health insurance provider and I would prefer to avoid permanent nervous system damage I told Julie there was no way we were getting any of those doors. Sorry ’bout your bad luck…

Now, at this point Julie and I were getting into a fairly expressive argument over how I wanted her to be miserable the rest of her life by choosing my nervous system over her door, and an employee came over to see what all the fuss was about. Julie explained how much she loved toxic doors and I explained how much I love not dying, and the woman did her best to quell my fears. “Oh, you have nothing to worry about,” she said reassuringly, “I’ve been around this stuff for two whole years and I’m fine!” At that moment we both noticed that her hair probably hadn’t been washed since 1997 and she spoke through what can only be described as “meth teeth”… and we began looking for the exit.

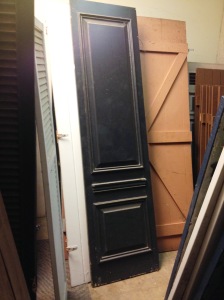
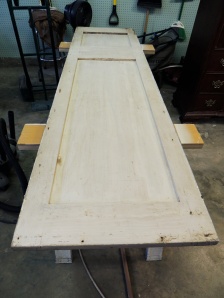
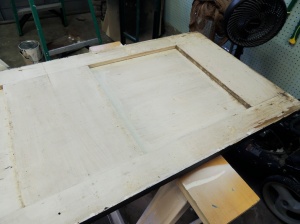
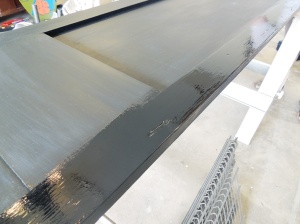
Anyway, Julie has already told a mostly accurate story of how we found our actual door, so I’ll skip forward to what we ended up doing with it. It was in pretty sad shape when we got it and definitely needed to be cleaned up and painted, but overall the wood was in good condition except at the very bottom (this is a shot of the back side, which was never painted since it faced the side of a house in its former life as a shutter):

DO or DIY | Pantry Door Transformation

DO or DIY | Pantry Door Transformation

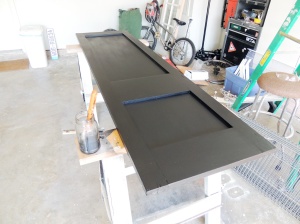
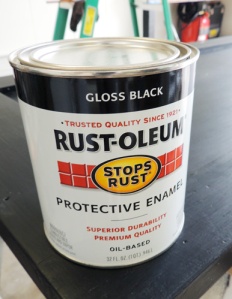
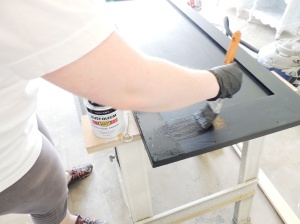
Once we got it cleaned up and scraped off any stray splinters, we painted it an oil-based flat black. I really hate working with oil-based paint, but they really do lay down the best finishes.

DO or DIY | Pantry Door Transformation

DO or DIY | Pantry Door Transformation

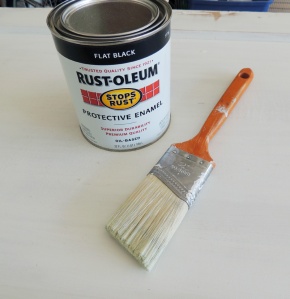
True to form, Julie’s original color choice didn’t last long, and a day later she decided it looked too much like a chalkboard. So I went out to buy some gloss black.

DO or DIY | Pantry Door Transformation

DO or DIY | Pantry Door Transformation

DO or DIY | Pantry Door Transformation

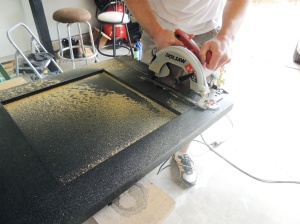
Once it was painted, I had to cut it down to size. Remember the bit at the bottom I said was in sad shape? Well, as luck would have it, that’s exactly how much I needed to chop off!

DO or DIY | Pantry Door Transformation

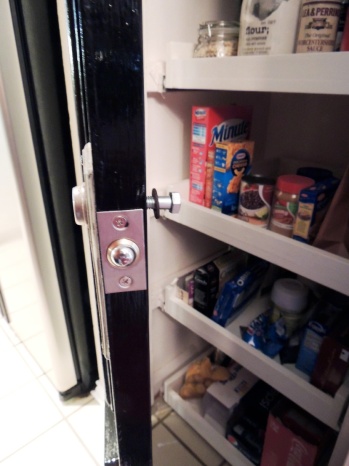
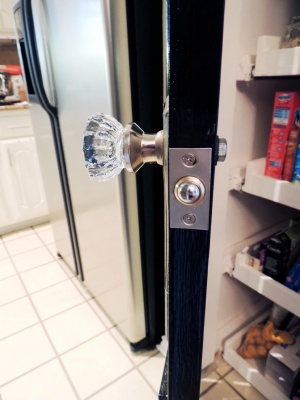
The final challenge was finding a latch. We were able to re-use the hinges from the old door, but the molding and accents on the door made it just impossible enough to fit a traditional latch that we were once again scratching our heads. My brilliant solution? A ball catch, typically seen mounted on the frame of a door that presses closed. This basically made our knob a dummy knob, which meant it could be mounted anywhere we wanted.
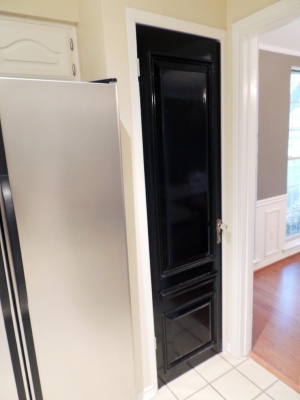
DO or DIY | Pantry Door Transformation

DO or DIY | Pantry Door Transformation

After.

DO or DIY | Pantry Door Transformation

DO or DIY | Pantry Door Transformation

DO or DIY | Pantry Door Transformation

DO or DIY | Pantry Door Transformation

DO or DIY | Pantry Door Transformation

DO or DIY | Pantry Door Transformation

DO or DIY | Pantry Door Transformation

His.

“It’s like, how much more black could this be? And the answer is, none. None more black.”

Pop quiz- what movie is this from?

12 Comments

Filed under Kitchen

What’s Cookin’ Good Lookin’?

Hers.

Chris and I have had a multiple number of “funds” over the last few years.  The new car fund, the big screen TV fund, and the entertainment center fund to name a few.  In theory, any extra dough we can squirrel away is transferred to this fund and untouched until we reach the goal… however, that hasn’t stopped Chris from dipping into the fund a few times (yes, Chris, I noticed).

Our latest fund has been the “oven fund.”  New ovens weren’t high on our priority list for a couple of reasons, one being that they worked fine and got the job done.  The biggest reason, however, rested on the fact that both of us will do anything possible to get out of cooking.  That said, we couldn’t really justify springing for a new set.  Another obstacle was the fact that we have such an oddly-sized oven, 24″ wide, and no possibility of expanding (without a lot of trouble) since they’re built-in to the brick wall. Weird sized oven = hard to find and expensive.

Behold said oven.

So, not exactly the prettiest of ovens (especially since the degrees on the temperature knob had been worn off over time making the task of setting the oven correctly quite the feat), but definitely not the worst.  Thus, we started a fund and promised ourselves if we ever found a fantastic deal on one and we had enough in the fund, then, sure, why not.

Well, nearly a year after starting the fund, we stumbled upon too good of a deal to pass up.  Cashing in our moo-lah, we couldn’t wait for it to be delivered.  And that’s when then the 8 hours of fun ensued…

His.

This doesn’t surprise too many people, but we don’t cook- like, at all- so I never really thought much about our oven. It was old, but it worked well and was fairly easy to use, which was all one can really ask for in an oven, right?

Wrong. After we got settled from the move, Julie announced that the ovens were “ugly” and demanded that they be replaced. Now, keeping in mind that neither one of us ever gets much use out of an oven, she at least agreed to put it pretty low on the priority list… but, of course, it was only a matter of time before she’d finally snap and demand a new oven.

Well, that day came just a few short weeks ago. After about two years of searching, we finally came across the right oven at the right price (apparently there’s no demand for 24″ ovens). We scheduled a delivery and they even agreed to haul off our old oven to be donated, and it was probably obvious to everyone involved that I had no idea what I was getting myself into. And they were right.

First things first: remove the old oven. I had no clue how this thing was attached, but I knew of at least one way to find out… and that was to just start unscrewing things.

Not surprisingly, I ended up removing components that didn’t need to be/shouldn’t have been removed, and I stumbled across an unopened set of wiring diagrams… shouldn’t those have been read by now???

I knew this thing was going to be heavy, but I had no idea how heavy. I brought some extra tools just in case it weighed 3.5 tons.  Hint: this turned out to be an unnecessary step.  The thing didn’t budge.

As luck would have it, oven doors are removable. And removing them makes removing an oven easier. It also exposes just how nasty ovens can get.

At this point, I had no idea what to do next, so I just grabbed the oven and started trying to move it around, and it actually worked- the oven began to slide out, but definitely required some “coaxing.”

This thing didn’t budge easily, and I knew it would be a toe breaker. It also had sharp edges that looked like a really efficient way to get tetanus, so I put on my work gloves and grabbed a cart to get some leverage.

Once the oven was removed, I could see what I was working with.

My favorite part of electrical work? Sorting out someone else’s sketchy electrical work.

A few quick measurements later, we realized our microwave would have to be moved up. Doh!

And on the first installation attempt, we discovered we’d have to remove the trim.

On the second installation attempt, we realized there were some trim screws that made it too wide.

My solution? Notch the wood. With a drill.

Microwave test fit #1.

Removal #3 in preparation for microwave test fit #2.

A little more notching…

At this point, Julie decided to become paranoid about the weight of the microwave, so I had to build a more robust shelf.

Sometimes these projects get me into some really tight spaces.

Can you guess what project I had leftover shelving from?  Hint: this one.

Final wiring:

Julie decided we should leave our mark on the house (my signature drill-notches were unacceptable, apparently) before the final, permanent installation:

By this point I was pretty much praying we had resolved all the fitment issues, because I was getting really tired of moving ovens. I should also mention that Julie had already given up by now and was watching TV. Impatiently.

Finally.

We still have to finish all the trim, but you get the idea. With all stainless steel appliances, granite countertops, and a huge brick wall surrounding the oven and stove, we have a pretty impressive kitchen, especially for two people that barely know what cooking means.

Just don’t look at the floor.

After.

And thus begins the start of the floor fund…

2 Comments

Filed under Kitchen

Check the Label

Hers.

With a new pantry (check that out here if you haven’t seen it yet), comes the chance to do one of my favorite tasks.  Let’s say it together: re-org-a-nize.  Ah, the thought brings joy to my heart.

Have I mentioned that I L-O-V-E Pinterest?  Hm, thought so.  Well, I picked up this great storage idea from The Painted Hive which not only looked great but it was relatively inexpensive to replicate.

I followed her advice and picked up a few SLOM jars from IKEA: one 17 oz, two 34 oz, two 61 oz, and one bottle with stopper for a grand total of $24 pre-tax.  Not too shabby.


The Painted Hive’s guide involves using magic decal coating paper which she sources from an Australian company and it was a little pricey (try $14.90 for three sheets)… yikes!  It sounds like a great material but we weren’t ready to invest in the jars for that much just yet.  We decided to use regular clear sticker paper instead and just kept in mind that we wouldn’t be able to run the jars through the dishwasher as the ink would probably come off.  I’m pretty much a hand washing pro though, so I wasn’t too phased.

We found Avery clear, decal paper for $13.60.  For 10 number of sheets, the price wasn’t too bad and now I have a supply of sticker paper on-hand for the next random project that arises (with Pinterest, I’m sure it won’t be too long).

What I liked best about The Painted Hive’s tutorial was the label design she created.  I wanted to create a few additional food item labels and use a slightly different font (more of a typewriter look), so I decided to create my own labels.

Based on food we store, I decided to recreate The Painted Hive’s brown sugar and flour labels, create slightly altered powdered sugar and granulated sugar labels, and then created new labels for oatmeal and olive oil.  Feel free to download the PDF of the labels below for your own food storage jars!  Download here.

And guess who I suckered in to applying the stickers?  🙂

His.

Alright, I don’t know what it is about women, but they’re obsessed with storage. I don’t just mean a place to store things, but I mean how everything has to be cute and stylish in some way. It’s not enough to put something in a box or on a shelf behind a door; no, everything has to have some clever storage solution, and quite honestly it drives me nuts.

So I catch Julie fawning over something on Pinterest and foolishly asked, “What’s that?” I hardly blinked before Julie threw my keys at me and shouted that we were going to IKEA. Um, OK, but she refused to tell me what for (which is a sure sign that it’s something that will require a lot of work… on my part). We finally get about halfway through the “Help Yourself” section (or whatever it’s called) when Julie points off in the distance and yells, “JARS!” At this point, I was a bit confused, as I had jars at home. No, apparently these were special jars. They had a few different kinds which were all either $4 or $6. Initially, Julie picked out all $6 jars, but I convinced her to pick a few of the $4 variety, including a bottle I promised would hold olive oil (an idea that made her eyes light up almost as brightly as the day I proposed).

We then scurried off to Office Depot in search of a transparent adhesive paper to make the labels, but all we could find was translucent, which gave the labels a “frosted” look which was decent, but not quite what we were looking for (which I like to think is an antique chemistry lab look, but is probably not the case).


As I applied the labels, I noticed that the moisture from my skin made the “frosting” rub off the paper… which gave me an idea. I grabbed a clean sheet and a damp paper towel, and buffed away like I was giving suede shoes a mirror finish. After about 20 minutes of carefully wiping the “frosting” off, I had what looked like a sheet of packing tape.

The bottom sugar label is the frosted look and the top sugar label is after my buffing work.

And here’s a shot to show the frosted paper versus unfrosted after applied on the jars.

Julie printed and cut another set of labels, and we finally achieved the look we were going for. I was paranoid about the ink rubbing off such a high-sheen surface, so I only handled the labels by the very outer edges, and we used Q-tips to push the air bubbles out.

I just never realized how much sugar we have in this house.

After.

Here’s the final line-up.

And a close up of our beautiful new food storage solution.

And here they are in our stunning new pantry.

I think I may have a new label fetish.  Hmm… need to find more things to make Chris label stat.

44 Comments

Filed under Easy DIY Projects, Kitchen

Extended Shelf Life

Hers.

So, if you follow me on Pinterest (for those missing out, find me here), you saw me obliterate the site with pantry picture after pantry picture.  Our pantry needed a serious storage overhaul.  Yes, cue the “first world problem” joke now.

Here’s what we were working with.

Not too bad so far, but let’s open the door.


Yikes, look at all those groceries.  Hmm how to reach them?  Easy solution- just wheel the thing out as it was intended.

Hm, no dice.  Still stuck in the same spot.  Ugh.  The pantry solution they built didn’t live up to its intended purposes, unfortunately.  The weight of all the groceries made the whole thing ineffective.  The thing was supposed to pull out much like the below picture.

There was just too much weight for the tiny wheels to do their job.  We were running into two main problems:

1) We weren’t making effective use of all the space.  Look at all that potential storage!

2) Groceries were getting lost in the back which is the reason we found a box of crackers that expired a year before we eventually found them.  Mm, tasty.

So, the dreaming began.  I found these magnificent pantry solutions on Pinterest.


Ah, yes, the solution would be individual pull-out shelves.  It was perfect!  That way we wouldn’t need to worry about pulling the whole pantry out thus running into the same weight problems.

I had visions of Container Store-level storage solutions dancing in my head.

I found these bamboo pull-out drawer options at Container Store but the maximum width was 20″ and we needed something 22″ wide.  And they were $69 each, meaning for five shelves we were looking at $345.  Not an ideal price for something that we’d have to figure out how to fit anyways.

We found another solution at Lowe’s in which we could order shelves that fit to our exact specifications through a vendor called Slide-A-Shelf.


We were getting closer to a solution but the price was still a little disheartening.  We were now looking at $425.  As Chris added this up in his head, I could tell he was convincing himself that he could replicate this for MUCH less expensive.

And we were off!  New pantry here we come!

The one thing I didn’t consider was the fact that we’d be living out of storage bins for meals.

Scrounging around plastic bins to find sugar, Paprika, and mac and cheese wasn’t exactly a thrill ride for someone OCD about organization.  Needless to say, the pressure was on to wrap this one up quickly.  Well, quickly turned out to be closer to four weeks rather than Chris’ original projection of it being just a “weekend project.”  My daily chants of “are we done yet, are we done yet?” probably didn’t help too much either.  Thank God one of us has patience (hint- it’s not me).

His.

There were a few items we found in this house that had us scratching our heads- the gun rack/mini bar combo, the wood paneling, the freaky faucet in the guest bathroom- and the pantry was no exception, albeit a little more subtly. It was on wheels and presumably built with the intention that the entire contraption would roll out, but anything more than a bag of chips would weigh it down too much to roll… so getting to the pasta was a bit like spelunking. It was fairly well-made and was easy to hide (they had the decency to include a built in door… how thoughtful) so it took a back seat to a lot of other projects. Watching Julie struggle to reach the Pop-Tarts, though, I knew a solution would have to be found eventually.

Enter Pinterest, the bane of my existence.

Apparently while I sleep at night, Julie scours that stupid website for inspiration on ways to keep us busy on weekends. She stumbled upon pull-out pantry shelves, and it was all downhill from there. She went from dropping hints to flat-out pestering me to “fix” the pantry, and even put it on her Christmas list (seriously). I knew that I wasn’t going to get away with keeping the old pantry around much longer.

As with all of our projects, we looked into professional solutions first (just because I can do these things doesn’t mean I want to do these things). Conservatively, we were looking at approximately $400 for a standard solution that we would have to modify to fit, or over $500 for a custom fit solution… I’d rather keep tunneling to the basil. We then went to the store in search of a way to do this ourselves, and found some drawer slides in the home storage aisle that would bring the total closer to $200 (or $33 each), which was a bit easier to swallow, but still not tasty enough for our budget… no, we needed eBay- $48 shipped. 10-12 business days later and we were on our way to a new pantry (we purchase the 6 drawer slides for $5.99 each here).

First things first- out with the old. Once we took all the food out (the dining room table was now our makeshift pantry), it actually rolled. Sort of.


I wheeled it out the back door and stored in on the patio for a week. Fortunately bulk trash day was just around the corner, so I hacked it up with a sawzall and left it in a pile by the curb, never to be seen again.

Next, we decided to paint the walls inside the pantry. It had never been painted, and parts of it had never even been finished, and were still bare drywall. We decided to paint it the same color as the kitchen cabinets, but quite frankly you can’t even tell. Whatever.

Now the fun part- build five pull-out shelves. The means five shelves, mounting boards for five shelves, brackets for five shelves, fitting five shelves, sanding five shelves, painting five shelves… you get the idea. This was probably the most tedious project I’ve done in a long time.

I began by building the mounts for the brackets. These are critical in terms of support, but it’s not essential that they be pretty, or even exact, for that matter, so I cut 20 pieces of wood (10 2x3s and 10 1x2s). I used 2x3s because I had some left over from another project, and 1x2s because they’re not much bigger then the slides. Anyway, I mounted the 2x3s to the wall and wasn’t sure whether or not I anchored them to the beam, so I ran screws diagonally into the door frame to ensure they were mounted securely. The 2x3s didn’t add enough width in order to accommodate a shelf narrow enough to fit through the doorway when pulled out, so I had to mount 1x2s onto the 2x3s.


The most difficult part of this process (apart from the tediousness) was making sure everything was level. In order for the shelves to slide out properly, everything has to be even and level, not only in reference to itself but also in reference to its opposing piece. Doing it right for all five shelves was at least an entire day’s work!

Once the mounts were up, I could install the sliders- sort of. I actually had to pull the sliders apart and mount one half to the brackets, the other half to the shelves. This was probably the most frustrating part of the entire project. I realized early on that the pantry itself was not square and in fact narrowed as you went toward the back wall. Fortunately the slides had mounting tabs that allowed for gradual adjustments, so I was able to shim them out until both side were equidistant across the entire depth of the pantry.


If you’re still with me after the last two paragraphs, you’ve made your high school geometry teacher proud.

Hers.

If you’re not with him, don’t sweat it.  I was lost on day one.

His.

Anyway, we were finally getting to the meat and potatoes of the project- the shelves. Shelves are generally pretty straightforward, but this was a unique situation in that every shelf had it’s own unique width, and it had to be exact. When drawers are built for furniture, cabinets, etc., they’re built in a factory which ensures computer-aided precision measurements every time… I just had a tape measure. I measured the distance between the slides but had to subtract the width of the 1x4s I was using for the sides, and that was the width of the base. I had to make five unique measurements and precision cuts for the shelf bases, and once I had those pieces I had to make four sides for each one. I used 1x4s for the sides and back and 1x2s for the front so that the contents of each shelf would be easier to see, and to act as a handle. Finally, I nailed the inner slide piece to each side of the shelf. After almost going deaf from driving 125 nails into these things, I had some functional shelves.

Safety first!


The last order of business was to sand and paint everything.  I used high-quality wood which has pretty sharp edges, so we rounded them off and painted everything with an oil-based enamel so that it wouldn’t rub off from all the abuse they will undoubtedly suffer through.


I got the shelves installed but wasn’t satisfied with the amount of effort they needed to be pulled in and out. I insisted on ball-bearing sliders, but we definitely ended up with a lower end product. I doused the bearings and slider contact points with white lithium grease, and the difference was night and day (just don’t tell Julie I used automotive-grade lubricants in her kitchen)!

After getting everything installed I noticed what was possibly the greatest oversight in the history of the house: there was several feet of space above the shelves that had never been utilized properly, so I quickly cut two permanent shelves out of scrap wood to allow for storage of some of the items we don’t use very often. I mounted up the door I cut to size, mounted a spice rack to the door, and we were finally able to get our non-perishables out of plastic boxes.

If you think this post was long, well… so was the project. Believe it or not, this took longer than both our bathrooms combined. With more than a week’s worth of cumulative work days, this was perhaps the most labor-intensive project to date. As tedious as it was at times, it was definitely worth it. It required plenty of problem solving, precision, and craftsmanship to be something I’m truly proud of. Best of all, though, is that Julie is absolutely ecstatic and loves the new pantry, which made it all worth it… because that’s one less thing she can bug me about now.

After.

There’s just something about a new door that makes me so happy.

Look at all those crisp, white shelves just waiting to be stuffed with groceries!

Chris’ brilliant upper, fixed shelves for storing non-everyday items, aka Julie needs a stool to reach.

You know we had to do a staggered shot to show up those catalog, inspiration photos.  Oh la la.

And here are the shelves at their max length.  Look at all that storage!

It didn’t take us long to cram the shelves full again.

Everything is so easy to reach now.  It’s been a HUGE difference in grocery grabbing morale around here.

And here’s a full shot (although it doesn’t even show the upper, fixed cabinet).  Man, we crammed a lot of shelves in there.

Ah, there are those upper shelves.  Guess we won’t be needing you anytime soon, mister red solo cup.

And now for that spice rack.  Did this fool you into thinking I’m an expert chef?  (Pst, I’m the furthest thing from that.  Chris pretty much does all the cooking).

Did you notice those oh-so-cute labeled glass jars peeking out in some of the pictures?  We’ll be posting about those soon so stay tuned!

82 Comments

Filed under Kitchen

A “Screwy” Situation

Hers.

What does every school-aged kid and marketing professional look forward to every year?  Two magical words: holiday break.  Those two glorious weeks where you can go to bed as late as you want, sleep in as equally late, and spend the days doing whatever the heck you want.  Ahhh, perfection.

Last year’s holiday time rolled around.  Chris and I busily migrated from one family to another in the quick span of 3 days as Chris only had the weekend off.  As he went back to work, I soon found myself with a whole week’s worth of time to fill.  So, what did I decide to do?  Refinish our kitchen cabinets and install new knobs.  I was determined to show Chris that I could accomplish a handy task on my own, without complaint and without help.  No biggie.  I got this!

… not exactly.  Let me start by saying that I had never refinished a kitchen cabinet before (I actually had to Google it quite a bit before I even comprehended what I was saying by “refinishing”), I had just mastered the art of determining a Phillips head screwdriver from a flat head screwdriver, and the closest thing I had come to sanding was filing my nails.  Needless to say, I had quite the task in front of me but it needed to be done.

The cabinets had originally been painted a stark white but that white had now turned into a yellow-y cream over the years.  They were due for a refresh.  The last time the cabinets were painted, the hinges were painted over.  To help with the “refreshed look,” I knew that these cabinets would need a fresh, unpainted set of hinges thus I had to unscrew the hinges before painting then replace with new hinges.  Easier said than done.

During Chris’ first day back at work after the holidays, I set about attempting to unscrew the hinges.  Two hours, eight stripped screws, and one desperate phone call to my dad (who I can attribute my bountiful array of handiness to) later, I had successfully accomplished nothing.  Chris arrived home to a very sullen wife that night.  See the “during” picture below for a clear account of the state of the kitchen when Chris arrived home.  He couldn’t decide whether to be frustrated with me or prance around the house singing, “I told you so.”  But, as the dutiful husband (and after I put in several convincing pouts), he got to work and finally the cabinet doors came unscrewed.

“Ah!” I thought, “Now we’re on a roll.”  Wrong.  Cue the several hours worth of painting, repainting, drying, flipping the cabinet doors over, painting, repainting, drying.  Oh, and then we had to paint three coats on the interior of the cabinets as they were still the dark, original wood color.  Phew!  Before I knew it, it was Sunday night and work was calling my name the next morning.  But, we survived… after 9 days, 2 paint cans, 6 paint brushes, 44 hinges unscrewed (and rescrewed), and countless hours of 80s music (the only music Chris and I can agree on).

Was it worth it?  At the time, no.  Now that the memories have dulled?  Yes.  I love our new kitchen and am still amazed at how much a room can transform by a coat of paint, new hinges, and new knobs (and several hours slaving away).  God love my husband and his patience for my ambition.

Other things we did in the kitchen:

  • New curtains
  • Painted walls and ceiling
  • Installed new light fixture in kitchen nook
  • Repainted crown and baseboards
  • Installed new outlet and light plates

His.
I have a real job. That means I don’t get two weeks off at Christmas, so when Julie proposed that “we” refinish the kitchen over “Christmas break” it was abundantly clear that she meant she would refinish the kitchen. My only regret over agreeing to this was that I had to go to work the next day, meaning I couldn’t grab some popcorn and watch the hilarity ensue.

I refinished the cabinets in my parents’ house a few years ago, so I knew exactly what it entailed. Julie, on the other hand, had refinished… well, nothing. On top of that, she wanted to relocate the position of the cabinet pulls on the doors, which easily doubled the amount of work it would take to complete the project.

The old hinges had been painted over with oil-based paint, so paint literally had to be chiseled out of the screw heads. Because of this, I was very specific in my instructions to NOT attempt to remove the hinges. I love my wife, but I know that when she begins a sentence with “don’t get mad, but…”, it means I’m about to get mad. So when I walked through the door that afternoon and she greeted me with “don’t get mad, but something’s wrong with the cabinets,” I instantly knew what she had done- half the doors were gone, the other half were hanging by one hinge. That’s exactly what I told you NOT to do…

Anyway, I spent the next few hours painstakingly removing stripped out screws. Fortunately, I’ve always owned German cars, so busted hardware doesn’t phase me much. I should also thank my father-in-law, who had the presence of mind to tell Julie to just put the tools down and let me fix it before she made it worse after she called him panicking because the screwdriver “just kept jumping out of the screws.” Once everything was properly disassembled, the real work began- sanding, filling, stripping, priming, painting, etc. You’ve heard this story before.

The final task, though, was lining everything up. It drives me nuts when things aren’t properly aligned, so I had to fend off psychotic episodes every time I grabbed my cereal and saw how shoddy the alignment was on the old cabinets. I spent at least a day re-mounting all the doors, but my now cabinets are square, level, and evenly spaced. Of course, this is only half the battle, and I wouldn’t be able to stand uneven pulls. Another day later, I had even, straight, and level pulls. And now I can enjoy my Lucky Charms.

And here’s the evidence!
 

2 Comments

Filed under Before & After, Kitchen, Renovation