Hers.
Time to show you the ugliest room in our house. Wait, scratch that. Second ugliest room. Ugliest goes to our hoarder room… err… I mean, third bedroom. But more to come on that later.
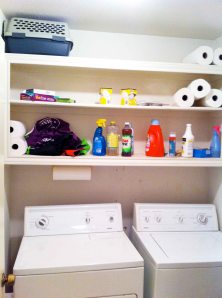
Yikes…
This tile used to be white… I think…
Ah, and here you see our nifty solution to stopping the cat from sneaking off to build a cave behind the dryer where I’m sure she would just diabolically plot to take over the world.
This is the view to the right of the door. Basically, just a holding house for laundry/cleaning/cat supply chaos.
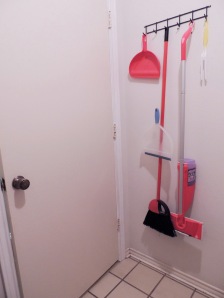
Here’s the view on the left, behind the door. Proof we have the supplies necessary to clean the house… just not the willpower.
Okay, so the room wasn’t terrible but it was white, blah, and not very functional. We had a lot of hooks and shelves but all our junk was exposed instead of being nicely tucked away. Who wants to walk into a room and see cleaning and laundry supplies displayed on every wall, like a second grader’s prized trophies? No thanks.
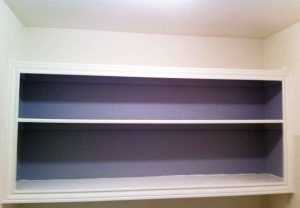
My first thought: let’s hop on the “paint the back of the shelves a bold color” bandwagon and see where that takes us before we go too cray-cray.
Well, it took us to a magical land of purple. And we all know how Chris feels about purple (if you haven’t seen our purple bathroom yet, read up on it here).
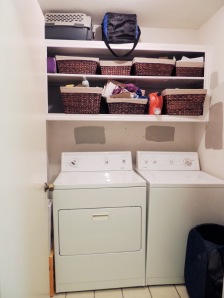
Not bad. Let’s stick a few baskets in there to better hide the supplies. Ignore the quilt of various beige paint samples on the wall. Want to know an embarrassing secret of mine? It took me a year and a half to commit to a color so the walls stayed like this for quite awhile. I blame the hubster- he’s now banned me from repainting a room a few days later because I decide I then hate the color. Boo, what a fun-ruiner.
You can also see a view of our light fixture… if you want to call it that. Yeah, that stayed that way for 2.5 years. What a sad excuse for a room.
So we lived with the room like this for 1.5 years until finally I had it. I was running out of rooms to redo and also out of excuses. It was time to get down to business and solve this laundry problem once and for all.
Time to turn to Pinterest to solve yet another one of my problems. I rounded up my inspiration pictures and prepared my game plan for the room.
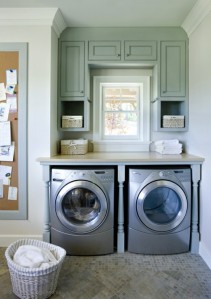
I wanted a bright pop of color but nothing too bold that it didn’t match the rest of the house (i.e. no bold purple in this room). I decided to go the teal/beige route much like these rooms I found.
Source: This Old House
Source: Houzz
I also knew a layout change was much needed. I liked the “n” shaped cabinet look seen below and had a great idea for what to put between the two long cabinets that would solve a good portion of my laundry frustration… well, besides having to actually do laundry (wouldn’t that be nice?). Hint: it involves where to hang up our line-dry clothes.
Source: Houzz
Source: Precision Stoneworks
Game plan was set. Now onto my favorite part, DEMO!
His.
I’m not really sure where to start, and maybe that’s why it took us so long to get around to doing this room. From a functionality standpoint, it did the job- it had functioning washer and dryer (electric and gas) hookups, enough storage to hold all the junk we wanted out of the way but needed inside the house, and it kept the cat’s business tucked away, out of sight. However, from an aesthetics standpoint, let’s just say it left something to be desired.
Perhaps the biggest issue was the open storage. As I stated before, we keep the litterbox in this room and, unfortunately, the door must remain open. This means that all of our stuff is exposed, which drives Julie nuts. We tried putting everything in baskets but that proved to be more of a band-aid for the situation, since we could never remember exactly what was in which bin. Furthermore, it seems like every piece of clothing Julie wears is “line dry only,” and there was absolutely nowhere to hang anything.
Clearly, we needed a solution. Believe it or not, this was more of a challenge than you might think. For starters, we were working in a very confined space, and we had a lot of stuff we needed to store. Due to the layout of the room, though, we could really only use one wall, and half of that was taken up by the laundry machines. We also wanted to incorporate a hanging area, meaning another large portion of the space was now allocated. On top of that, Julie had already picked out pictures she wanted to hang on the wall. What wall space did we even have for pictures???
Most importantly, though, this project had to be easy (I wanted to complete it in a weekend), and it had to be cheap. We drew up a plan (read: hastily measured one wall), set a budget (read: argued over finances for an hour), and darted off to Home Depot.
to be continued…






I was so enthralled with your whole story…and then I get a TBC! No! I wanna know what happens next now! Lol
Love the post and can’t wait to see what y’all came up with.
Haha so sorry Rebecca! I promise to post the next chapter of our laundry room saga (how dramatic does that sound?!) soon! Thanks for staying tuned!
-Julie
WHAT?!!! I want to know what happens!!Your writing is fantastic! I need you down in FLorida working on our house. Ya’ll are fantastic!
Haha! Sorry to keep you in suspense! Although you’re one to talk- I heard you have such good taste that your home buyer not only wanted the house but everything inside!
-Julie
That laundry space looks like heaven compared to ours. I look forward to seeing what you do do with it.
Oh boy! I can’t imagine worse! The only problem with fixing it up is that now I lost another excuse for avoiding laundry. “Honey, it’s too ugly in there for me to spend time washing our clothes” 🙂
-Julie
Too bad the litter box is in there because that area to the right (without any machines under it) seems like it would be the perfect spot for hanging “line dry” clothes!
That darn cat… getting in the way of all our grand plans! I promise that her cuteness makes up for her big stinky litter box… at least, that’s what I keep telling Chris (he’s not the biggest cat fan). 🙂
-Julie
I have to agree with Chris… I’m not a cat fan either but to each his own! =] I can’t wait to see what y’all do in there!
Pingback: Evacuate the Laundry Floor | DO or DIY
Pingback: A Little Laundry Teal-L-C | DO or DIY