Hers.
You may have noticed that we’ve been slowing down on room reveals lately. And not because we’ve run out of ideas but, unfortunately, we’re reaching the point of running out of rooms. Now what am I going to do with all this time? Finally learn how to cook? HA!
Hm, I could go through and start repainting rooms over and over again for a fresh, new look but that seems to instantly turn Chris into a grumpy old man.
So, my newest plan has been attempting to convince Chris that we need a new house to re-do… but that hasn’t been going too well either.
Well, finally we found a new venture we’re pretty well-suited for and keeps Chris’ grumbling to a minimum (still looking for that one thing that eliminates it completely… oh yeah, steak and potatoes). It’s something involving paint. Something involving transformations. While this could potentially describe the good ole days where I forced my brothers to sit still for a manicure while the babysitter wasn’t looking (what’s a girl to do without sisters??), that’s not it either. Our latest venture is (drumroll please): refinishing furniture!
There’s such a thrill in finding pieces just waiting for a new face lift, giving it an exciting new life. And thus begins our newest category of posts that we’re shooting for featuring every (or most) Fridays. Soo…
Welcome to Furniture Flip Fridays! I do love a good alliterative line!
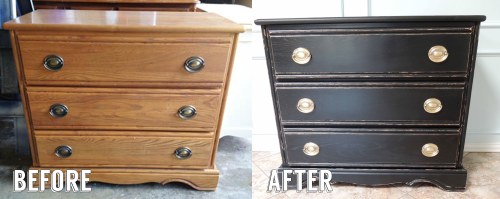
First up was this small three drawer dresser we found. It was solid oak, had great drawer hardware, and was just begging for a fresh new look.
Chris (as usual) had his doubts. I have to be honest, so did I. I was nervous this piece was too simple and generic… almost like if IKEA built solid wood furniture, it would likely be this guy.
But, we got him for a good deal and I thought he’d be a good candidate for a new look I was wanting to try out . We’ve primarily been refinishing pieces in antique white and I was ready to visit the dark side.
I decided to go with a satin black paint for a traditional yet elegant look.
While Chloe our cat held the dresser hostage as her new jungle gym, I realized I was at a crossroads: to distress or not to distress. I was tempted to keep it as-is but worried it was still too… well… blah. It was still looking really generic and only a step up from IKEA at this point.
I decided to go for it and busted out the sander.
In the meantime, I’m sure you noticed the glistening hardware in the last picture. I’ve been refinishing most of the furniture hardware in an oil rubbed bronze, but I knew that wouldn’t pop off the black so, instead, I decided to refinish the hardware to its natural brass finish.
In the above picture, on the right, you’ll see what the dresser hardware originally looked like. The handle on the left is what it looked like after being polished. I always use Brasso to refinish brass hardware (especially after this fiasco of first trying to figure out what product to use… tip: don’t ever use vinegar).
Chris had a pretty good idea of using a toothbrush to get in the small crevices. While a great idea in theory, it was taking too long. An old rag or paper towel, some elbow grease, and a lot of patience are really all you need.
I have to say, distressed black and shiny brass hardware may be my new favorite combination.
And it turned out so well, Chris has been rendered speechless or perhaps just distracted by that shiny hardware…
Transformation Breakdown:
- Paint: Rust-o-leum black satin
- Hardware: Refinished with Brasso to natural brass finish
After.
And as a reminder of how this piece started…
Much better! And he went to a great home – someone bought him to be used in their entryway (and, yes, all my pieces are gender-ized… this one happens to be a short, stocky male). Who knew this hum-drum oak dresser could turn into the statement piece for an entry? Amazing what a little paint will do!


That looks so good! I’ve been thinking of getting a buffet for our house, and keep looking at refinished ones, I might have to talk to you about maybe you doing it 🙂
Yeah let me know and I can quote you a price! We’ve been taking custom orders too. I actually have two large dressers/buffets waiting to be refinished now. I’ll e-mail you some pics.
-Julie
This is super. Congrats. POP
Thanks!!
-Julie
Nice touch with the sander. Some people tend to over do it. Looks great , might have to hit the garage sales or flea markets for a piece of furniture to play with ( repurpose that is )
Thanks Barb! Agreed- there’s a fine line between over-sanding and just enough. We just added slight distressing to give the dresser a little depth. I didn’t want the piece to look like it had fallen off the back of the car or anything that rough! Glad you like it!
-Julie
Did you use a paint sprayer to get such a beautiful finish?
We did use a paint sprayer and we love it! It provides such a better and even finish than brushing. We use a Wagner Control Spray Plus HLVP.
-Julie