Hers.
We’re baaack. I know we have a lot of catching up to do. So, let’s see… what have you missed?
Oh yeah, that. That would be from Chris falling through the attic floor.
As we were putting our Halloween decorations back, (Chris in the attic, me passing up boxes from the ground), I suddenly heard a yell and looked up to find a leg protruding through the ceiling.
Oh boy… looks like we’ll be brushing up on our patch-work skills soon.
So, what else have we been up to besides reinventing our ceiling?
Well, we set our sights on sprucing up our entryway from this sad little outdated pot light to something a little lot grander.
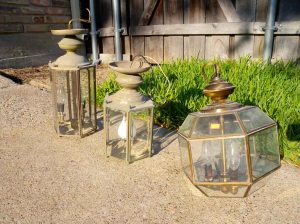
Remember these $5 lanterns I picked up from the ReStore awhile back (read up on that project here)? Before they became my latest table accessories, I thought one of them would be the perfect entryway light.
And here starts our journey of the three entry way lights… aka the story of how I succeeded in convincing Chris to install three different lights and survived to tell the tale.
Light Attempt #1
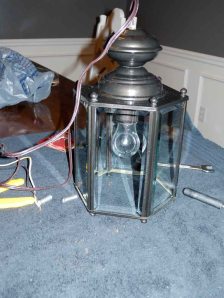
Our first light attempt used the shorter, hexagon-shaped ReStore light which we cleaned and sprayed with an oil rubbed bronze spray paint. It wasn’t terrible but I wasn’t convinced that it was the right solution. It just looked too small in the space.
Chris promised that he would replace it if I still didn’t like it after a week.
Big shocker, I still didn’t like it after a week so up went one of the other ReStore lights.
Light Attempt #2
This one was more of a rounded hexagon shape so I thought it would have a larger presence in the space without the risk of head butting unsuspecting visitors.
Meh. It was okay but really underwhelming. I wanted a statement piece and this guy was still too small and plain. I think these guys work better as table lanterns than functional entryway lights. So how was I going to break the news to Chris? A six pack of beer and a big “look how cute I am” smile should do the trick.
Well, it did work, but my punishment was living through it for months as Chris vowed he would only replace it one more time so the next light better be the one or else I better enroll in Electricity 101 classes.
Talk about pressure. But I like a good challenge. Unfortunately, the perfect light took a few months to stumble across.
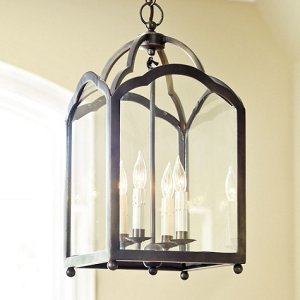
But first, I scoured Pinterest narrowing down the look I wanted and decided that I still liked the lantern look but I needed to go bigger, like way bigger.
Source: Inspired Design
Source: A Life’s Design
Source: Wisteria
Now, where’s a girl to find one of these massive beauts?
Source: Bellacor, $109.90
Source: Ballard Designs, $229
Source: Wisteria, $279
Source: Wayfair, $520.20
Source: Amazon, $729
Source: Lamps Plus, $750.91
Source: Horchow, $1,385
Can you guess which one’s my favorite? Hint: Chris would have an aneurism if I bought this light… actually, that’s a terrible hint because any price over $0 gives Chris an aneurism. Anyways, I just died over the Horchow light but not even I could justify spending over a grand for our entryway light.
I was excited to have the look narrowed down but a little disheartened by the cost of my options. At this point, Chris had a strict rein on our home improvement budget (he can be such a DIY scrooge!) so I needed a miracle.
*insert months of impatient scouring here… until…
We made a pit stop in the ReStore one Sunday looking for… well, probably something completely different… when I stuck my head into the “Last Chance Room,” a room of the broken, ugly, and outdated (you know it’s bad when even the ReStore calls it outdated).
I found this little guy wedged under a mountain of brass lights who are still hoping for the day that 1991 comes back in style.
It was PERFECT! It was the best combination of all the lights I loved. And then I looked at the price tag and felt like I had won the lottery. $60! But, wait, it was in the “Last Chance Room” and that meant *gasp could it be* another 50% off! Um, yes, $30!!
Uh-oh… that meant something was wrong with it and then I found it. One pane of glass was broken so they marked it down. All I needed to do was pop the glass out of the other sides and voilah, all fixed. No need for the glass anyways.
So, here’s the part of the story where I tell you I gleefully raced home to have Chris install it, right?
Wrong.
The DIY scrooge struck again. “That light is way too big. It’ll never work in our entryway. Our ceiling just isn’t that tall.”
Wah wah wah waaaaaaah.
Wives, I let our people down in that moment. I gave in to this ridiculous argument of “we should go home and measure before we purchase something that may not even work.”
Oh, but you know I gathered a dozen or so of those brass lights and heaped them on top of the light, hiding it from sight. No one was going to grab my perfect light while I was out on my fool’s errand.
We raced home, me lamenting all the way that someone was surely going to snatch the light up and Chris muttering to himself how illogical women are.
I raced through the door, grabbed the measuring tape, held it up in the entryway, showed Chris that it could be installed without people fearing for their heads, shoved him back in the car, and we were back on our way to the ReStore in under 10 minutes.
I took off like a mad woman through the store, shimming through old stoves, leaping over paint cans, and dodging racks of shovels. Okay, maybe it wasn’t as epic as that sounds, but I’m sure I, at least, looked like a mad woman.
Folks, you can breathe easy. Chris lived to see another day. The light was still there, in my same hiding place, untouched. You lucked out this time, hubby. I wasted no time from there. This sucker was mine and there’d be no more convincing me otherwise.
Ah, there’s nothing more that I love than a great bargain (except you, honey, of course…) and this was the bargain to top all bargains. This will be the tale my great grandchildren will gather around me to hear every holiday season. It was THAT epic. And Chris was pleased to find out that I had finally settled on a light so we could move on to another project.
What can I say, third time’s the charm!
His.
First of all, I didn’t fall through the ceiling. I exited the attic in the manliest way possible.
I don’t know what it is about women, but they seem to have some sort of obsession with lights. This strikes me as very odd, though, because this is the same gender that believes the quality of their looks fluctuates with the placement, intensity, and spectral range of light. Julie, of course, is no different: it’s not enough that the lights light, they also have to look good and put out said light in a very specific manner. So it was time to experiment.
Initially, I thought we had the light picked out. We had chosen the smallest of the three lanterns from the ReStore that we had refinished as it was short enough to hang from a decent length of chain. It was also a single bulb socket and I thought the light output was perfect for our very small entryway. I don’t know if Julie agreed or if she just likes making me mad, but this is the light we chose. So it’s the light I set out to install.
The first order of business was removing the old light. Most ceiling boxes are a 4″ diameter circle, but this light was a 10″x10″ square:
This meant I’d have some drywall work to do, and I despise drywall work. I cut a piece of cardboard to size to use as a template:
Once I had it cut to the size of the hole, I traced out where the ceiling box opening would be:
I nailed the ceiling box to the beam that ran alongside the light, and used the cardboard template to trace and cut a piece of drywall. First try fit like a glove! Tip: See my drywall screws? I glued a scrap piece of 2×4 to the top side of the ceiling so I’d have something to really hold the drywall patch.
Putty and paint makes a boat what it ain’t!
Here’s the light I installed. I guess the coloring is off because it’s supposed to look bronze or something.
All done! I used a ceiling medallion to help the light stand out a little more.
Well, it turns out that all good things really do come to an end, and Julie demanded a different light. I made her sleep on it for a week but she really stuck to her guns and threw a hissy fit over it, so I installed what she had now decided was the ideal light, which just so happened to be the ugliest light we own.
Look how terrible that is! It’s so bright in there I was afraid to turn on the light for fear the paint might burn off the walls!
I think Julie agreed, because she never turned on the light and finally admitted it looked horrible. Again, she demanded a new light, only this time I got wise- I was tired of her chronic indecision, so I agreed to install one more light, meaning whatever light she chose would be permanent. At first she objected, but I think she realized no amount of pouting was going to make me want to change that stupid light again. Every so often, she’d complain about the light and beg to change it, but I just reminded her of our deal, and that was that.
Well, she finally found it. THE light, she proclaimed. And let me tell you, this thing is huge. It’s so big that I was convinced it was going to be a skull-cracker and/or rip the ceiling box out (still not convinced that won’t happen). Before we bought it, I actually made her go home and measure the entryway to make sure I wouldn’t hit my head on it.
Alas, we came home with our new light. It came with like 8′ of chain but our ceiling is so low I could literally only use one link. It also had some weird scroll thing on the bottom which I also had to remove for liability purposes. But hey, you can’t make an omelet without breaking a few eggs.
Ignore the socks. All of them.
Julie threatened my life if I didn’t include this picture:
After.












Julie is right! It looks perfect! I appreciate seeing the pictures of changing the light box, because I will need to do something similar in my kitchen.
I love it!! I need a Restore by my house. Not fair.
Thanks! I know it’s been a gold mine for us lately!
-Julie
Yay light! Third time was a charm. I wish my Restore had some cool lanterns – their lighting section is mostly full of the “boob” lights I want to rid my house of!
Oh, I hear you on the boob lights. They’re all over our ReStore too. The lighting gods were smiling down on me that day though, I guess. The thrill is in the hunt though, right?
-Julie
I’m with everyone else – love the 3rd light! Sometimes you don’t know what’s right until you’ve ruled out what’s wrong. And I don’t buy all your grumbling, Chris! Changing out the box was a lot of work, but swapping fixtures after that isn’t tough. I’ve done it, so that’s how I know. 🙂 I love how the metal in your door and the metal in that light look together. Very cool!
Yes, another one on my side! I so hear you- sometimes you just have to see it! Glad you like it! I told Chris if we ever moved, we’d probably have to tell our buyers, too bad but I’m taking this light with me. 🙂
-Julie
I actually kind of like light number #2, but understand if you’re trying to avoid burn marks on the walls.
And Chris did you catch your hip on a rafter? That’s the worst … not that I’ve ever exited off roof in such a manly manner after knocking my own foot with a missed sledgehammer swing.
The third light is perfect! We, too, are searching for a new entry light, and I am wondering how tall your ceiling is and how low your light hangs? I was happy to see someone using only one link of chain on a big lantern light like you did, as I wasn’t able to visualize it before. Its been something I’ve been worrying about as we search and now I know that a short chain is not going to be a big deal. Really good job!!
The ceiling in our entryway is 9 feet high. There’s a 6.5 foot clearance under the lantern’s lowest point. Chris likes to point out that some of his taller uncles would have a problem clearing the lantern without a head bruise, but considering about 98% of the population wouldn’t have an issue, I decided to go ahead with hanging it. It doesn’t look low because our ceilings are slightly vaulted in that space. I was a little worried about the chain length as well, but I think it looks fine! I don’t think anyone would notice without pointing it out anyways! Good luck with your search!
-Julie
I just stumbled onto your blog from Pinterest. That definitely is the perfect light. But I have a tip I learned from a professional drywall guy…the next time you need to make a patch, do the same thing you did with the template, but then cut your patch piece a few inches bigger than your hole. Trace the template onto the back and score the lines, not cutting all the way through to the front. You’ll kind of break the drywall the rest of the way through, making sure to leave the paper on the front of the patch intact (so the square of drywall will have the front paper larger on all four sides, just on the front. Then, when you fit your patch into the hole, the paper covers the seam & you don’t have giant gaps to fill with spackle that, over time, become all bumpy and crack! Some people use tape to cover the gap, but doing it this way only leaves you with one edge that has the potential of lifting/peeling instead of 2 with tape.
What a great tip, Paige. Thanks! This will definitely come in handy… especially since we now have a hole in our garage ceiling from where Chris fell through from the attic. 🙂 Glad you found us!
-Julie
Awesome, awesome, awesome!!! Way to go Julie! It looks perfect for the space. And Chris, you rock. You did a great job putting it in. Just discovered blog and love it!
Thanks Carol! Glad you found us!
-Julie
So glad I found you guys, trying not to laugh out loud at work while reading. That is a perfect light fixture! Congratulations, enjoy the envy of others. Must return to my ‘research’ now.
acrylic oil painting I love this piece. It goes with all of our other grand room decor items and would fit in any room.