Hers.
Our living room is MA-SSIVE. Seriously, we have way more room than we know what to do with, which in turn creates way more walls than we know how to decorate. Ah, yes, here’s one of our big, sad walls.

We’ve hung up photos, art, even a giant key (more on that here). Needless to say, I’ve been running out of ideas for something new, clever, and most importantly, things that take up a lot of wall space.
Maps have been on my mind lately and I wondered if there was a different way of displaying them. I found these inspiration photos and knew I was on the right track:
Source: Little Birdie Secrets
Source: Desire to Inspire
Source: DecorPad
Source: Pinterest
I had the idea, now all I needed was an awesome map. I remembered back to a little shop my Mom and I had once visited. In the veeeery back of the store was a box full of reproduced vintage maps of Texas cities. At the time, I thought they were interesting but hadn’t yet been inspired to grace my walls with unique maps so, sadly, the map went another day without a happy home. Little did it know that I’d be sending my Mom back a few months later to grab him up.
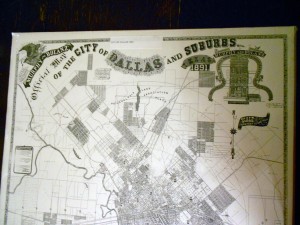
I decided to go with this map of Dallas and its “suburbs” from 1891. This map is hysterical! Every suburb it lists is now in the heart of the city, a solid 10-15 miles from current Dallas suburbs. Oh, little did they know…
At the bottom of the map various population characteristics of Dallas from the 1890s were listed such as this gem: “the population is predicted to be 20 million in the year 1991,” a far cry from the 1.2 million who currently reside there.
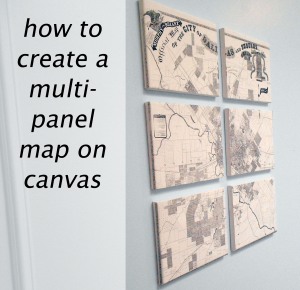
Much like my inspiration photos, I decided to cut the map up into several slices, creating a more interesting image and taking up more room on the wall.
Before I made the final decision to cut up the map, I decided to use magazine pages to create a template and temporarily tape it to the wall to determine the spacing between each section and its exact placement on the wall.
While Chris thought I had lost my mind when I posed the idea of taping magazine pages to our wall, this was just the thing I needed to solidify my decision.
Would you be shocked if I said our wall stayed like this for a full 7 days before coming down? You never know what you’re going to find at our house…
Originally, I thought about framing the cut versions much like the DecorPad inspiration photo but I didn’t like the look of the black frames between each of the sections. It looked too choppy and broke-up the overall look of the map. I made up my mind to go the canvas route instead. It would add depth to the map and provide clean lines between each of the sections. It would also be easy and inexpensive to do.
I purchased six 8″ x 10″ canvases from Michael’s which came in 2 packs for $4 each.
I laid the canvases out on top of the map and it was a perfect fit if we cut off the population statistics at the bottom, leaving just the map.
I then cut the map into six equal sections, centered on the six canvases.
A little measurement was needed… thus Chris was called in (if a project calls for calculations, it only takes me a minute or two to throw in the towel).
Cut, cut, cut.
And then it was pretty much in Chris’ hands.
His.
One of the most prominent features in this house is the living room- it’s bigger than our first apartment (let’s pretend that’s because we have a huge living room and not because we had a tiny apartment). It’s also what the house is really built around, as everything else is basically just there out of necessity. It was also custom built in the late 70s, right around the time the “open concept” trend started to take form but hadn’t been refined to the point of the seemingly supportless structures of today’s modern home: it’s large and open, but also closed off from the rest of the house… hence, lot’s of wall space.
Julie has pledged to leave no wall uncovered, so I was now tasked with cutting up a map, gluing it to six canvases, and nailing it to the wall. Wait… what?
I’ve learned not to ask questions, so I just went to work. I had six pieces of a map (none of which led to any treasure) and six canvases, and had to make them be one. Without any wrinkles.
As usual, I turned to cars for a solution: automotive headliners are usually glued in with a special spray adhesive, which is actually what gives it that “new car smell” (I bet you’ll be the only one of your friends that knows that now, too). Automotive-grade sprays are expensive, thick, really sticky, and get you slightly high, so I opted for a less intense form from the hobby store:
First, I sprayed the canvas. I wanted the adhesive to soak into the cloth before applying the map so it was less likely to bleed through. It needs a nice, thick, even coat in order to adhere properly.
Next, I laid the map over the canvas.
Carefully smooth everything down. Make sure you don’t have sticky fingers (literally) that can tear and smear the map.
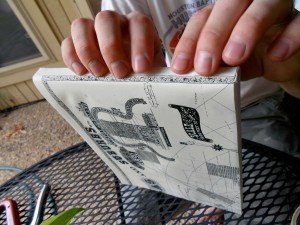
Roll the edges. Daintily.
Fold the remaining edges over the ends and staple them down. Ca-chunk!
Map(s).
After.
Hers.
I’ve been debating whether or not to find a white vintage frame to hang around the whole piece to give it more of a presence on the wall. What do you think? Framed or unframed?


Unframed and like the description – especially doing it daintily!! Great idea.
Thanks for the vote (and for the map), Mom!
Freaking awesome!! Love this.
Thanks Sophia!
-Julie
Framed. Did you trash all the population statistics? Is there a way to work that in?
Framed – 1, Unframed – 1. All tied up.
I couldn’t decide what to do with the stats. It was tiny copy and faded in some spots so I did end up trashing it. Boo.
-Julie
How did you know how much space to leave on the edges of the map sections to fold over and staple? i.e. did you do it all the way around and behind? and what did you do with the corners? I love this idea, and I had been wondering how to do it!
(didn’t mean to post as a reply to Bailey,,,opps!)
Great question, Katie!
So, the overall dimension of the map was 22″ wide by 25″ long. We ended up going with six 8″ x 10″ canvases, stacked 2 canvases wide and 3 long. This meant we had exactly 1″ leftover for the right side, 1″ for the left side, and 1″ leftover for the bottom, which was just enough to wrap the map around the side and staple the edge on the back.
We decided to only wrap the right side, left side, and bottom since no one would see the top side or the internal sides between each canvas. It would also be weird if we wrapped the internal sides, thus interrupting the overall image of the map.
For all the other edges, we glued the map flush with the side so you couldn’t tell the edge was uncovered. Thus the only corners that we had to deal with were the bottom right corner of the bottom right canvas and the bottom left corner of the bottom left canvas. For those two corners, we stapled the right/left side down first then folded the bottom side down (like you would do for the side of a present) and stapled it. Make sense?
-Julie
Love the map wall art – beautiful!
Thanks Heather! Sadly, this project has led to my quickly increasing obsession with maps. Chris shot down two attempts of mine this weekend to purchase another map!
-Julie
Unframed! It looks great =)
I love it!
Frame it. Looks rather small on that big wall and a frame will add to the size.
The map looks great – what a fabulous idea and project!
Framed – 3, Unframed 2. Thanks everyone for the input!
Love your divided map idea. I live in Dallas and would really like to get one of the old maps. Will you share the name of the store that has the old city maps? Many thanks. You can just send me a private email , if you like.
Hi Susan,
We found the map at a shop called Rancho Deluxe in Wimberley, TX (just outside of Austin, TX). The shop is located in the main town square. I hope that helps! Glad you liked the map!
-Julie
I vote framed to anchor the map to the wall. I’m loving your blog!
Thanks for the vote, June! I’m currently on the hunt for an awesome frame for these… too bad it’s such a weird size!
-Julie